Node.js and MongoDB: A Beginner's Guide to Building a Simple CRUD Application
Hi, Nice seeing you here I am a Software Engineer with a background in Computer Science having in-depth knowledge of Backend Development, Frontend Development and DevOps. I Love building and deploying systems with my knowledge and create a product that is easily accessible to all. Really appreciate your time.
STEP 0 : Creating an empty Nodejs repository
Go to your desired directory and run the below command to setup an empty directory with package.json
npm init -y
STEP 1: Creating a server
To create an express server we have to install express
STEP 1.1: Installing Express
npm i express
the above command will install the express library to your project.
STEP 1.2: Setting up the server
Create a new javascript file - you can name it anything, for the sake of simplicity let's call it server.js A node server can be set up by just three lines of code as
const express = require("express");
const app = express();

app.listen(3000, () => {
    console.log(`App is up and running at port 3000`);
})
STEP 1.3: Install and configure dotenv
we will be using some high confidentiality passwords/keys in the project, so it will be beneficial to not save them as such in the project but to create a non-versioned file and store them in that.
to have this kind of feature we have to install dotenv
npm i dotenv
after that create a .env file in your project and for now, add the value of PORT there, we will use the value of port from there.
.env will look something like this, it stores data in key-value format.
PORT=1667
now to use this value of PORT from .env, we have to configure dotenv in the server.js file and use the value.
const express = require("express");
// This line is setting up the .env so that we can use it in our code
require("dotenv").config();

const app = express();
const port = process.env.PORT // This is how we can use it

app.listen(port, () => {
    console.log(`App is up and running at port ${port}`);
})
STEP 2: MongoDB and Mongoose
STEP 2.1: Setting Up the Mongo
To use MongoDB, we can either install it on our machine or spin up a MongoDB database on mongo's website.
Let's spin up a simple free database on mongo's website.
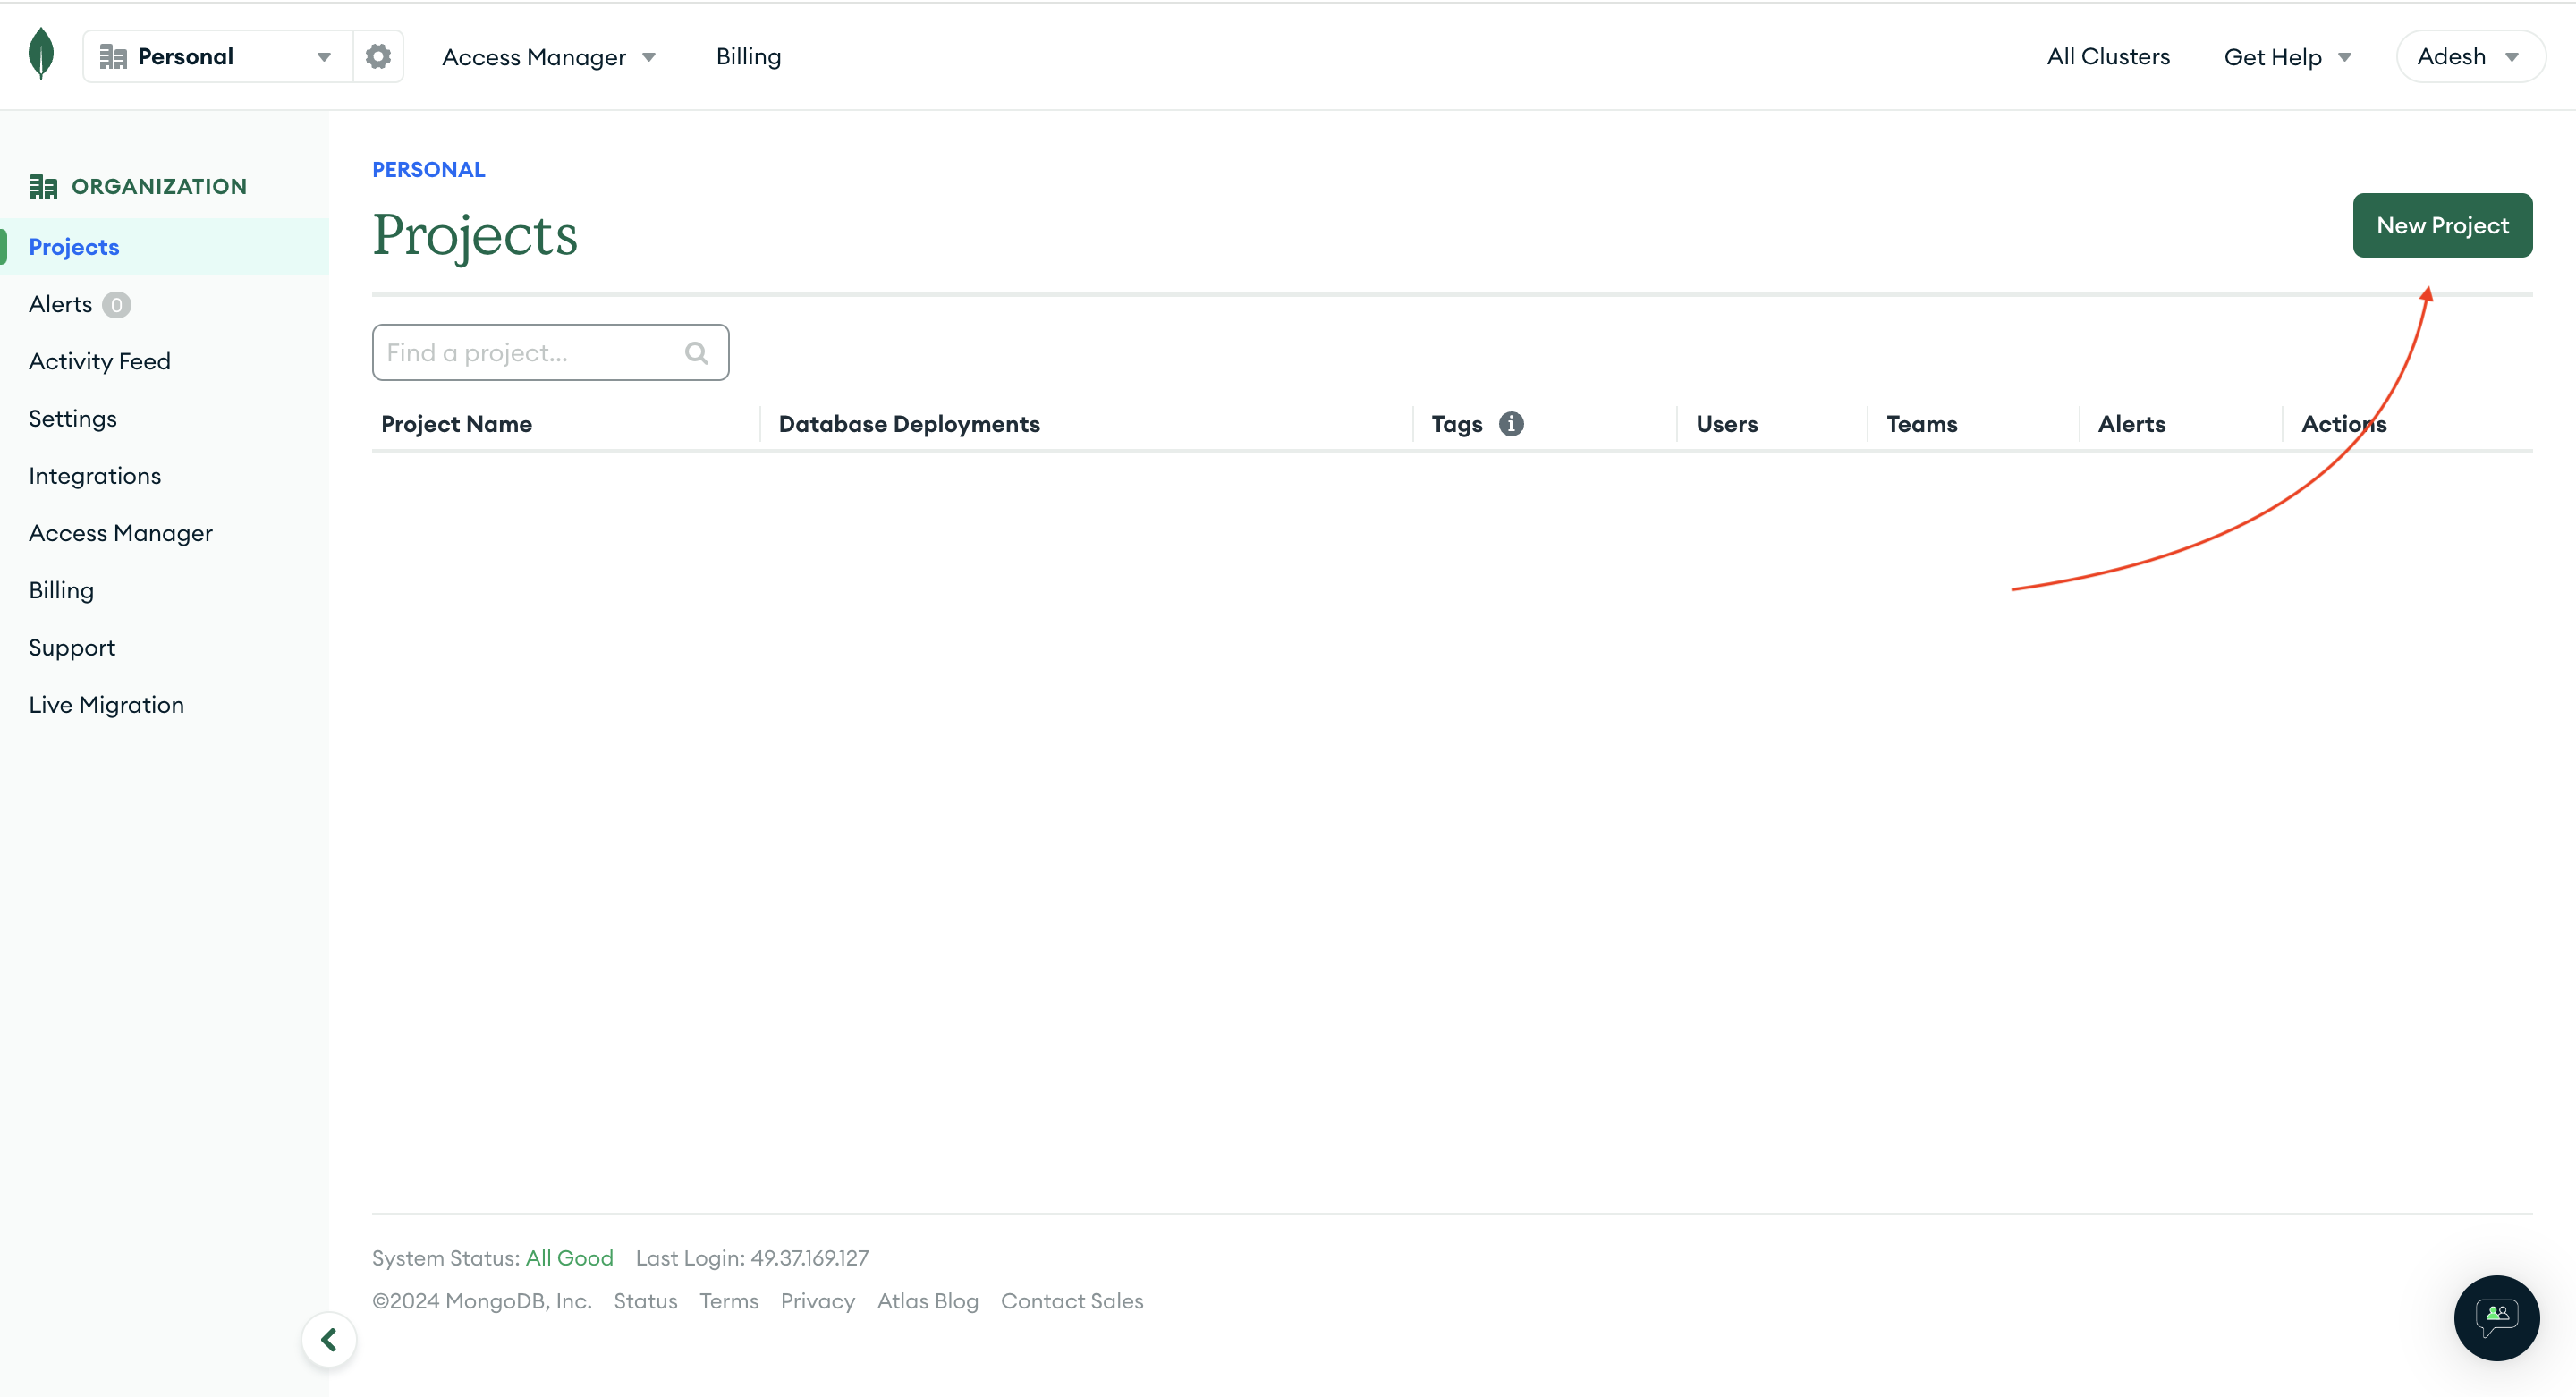
Once logged in, navigate to the Projects section and create a NEW PROJECT.
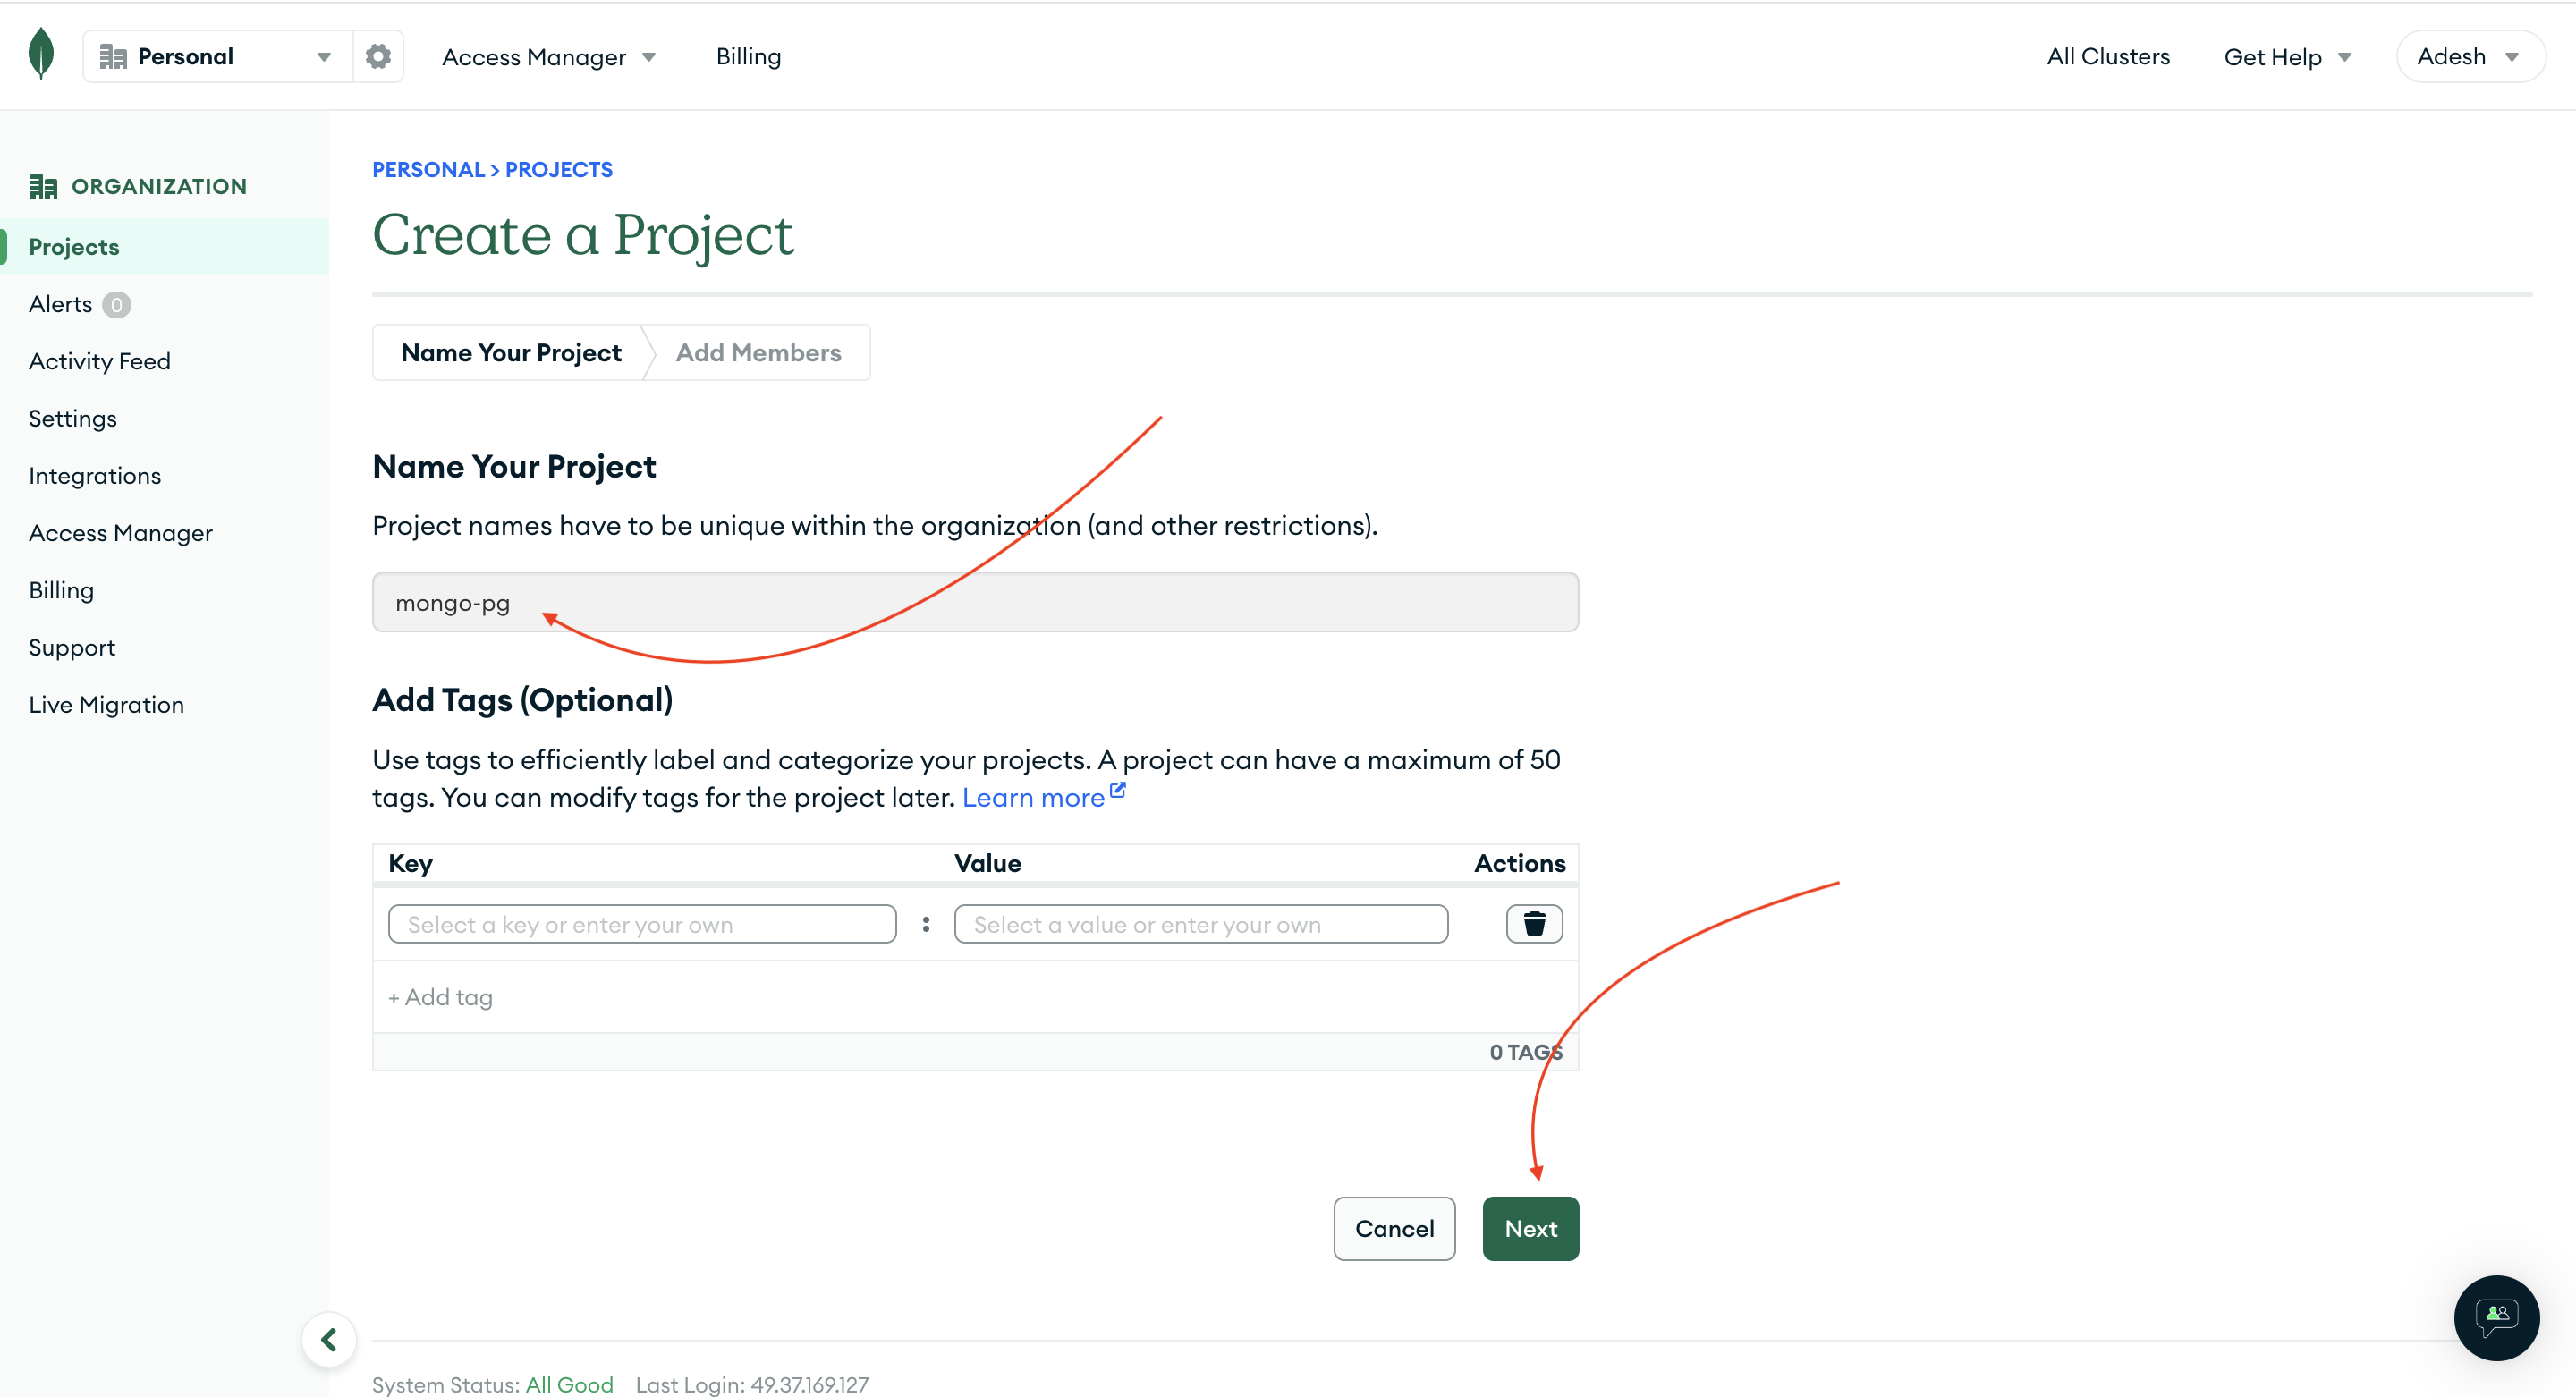
After that give a name of your project and click on NEXT.
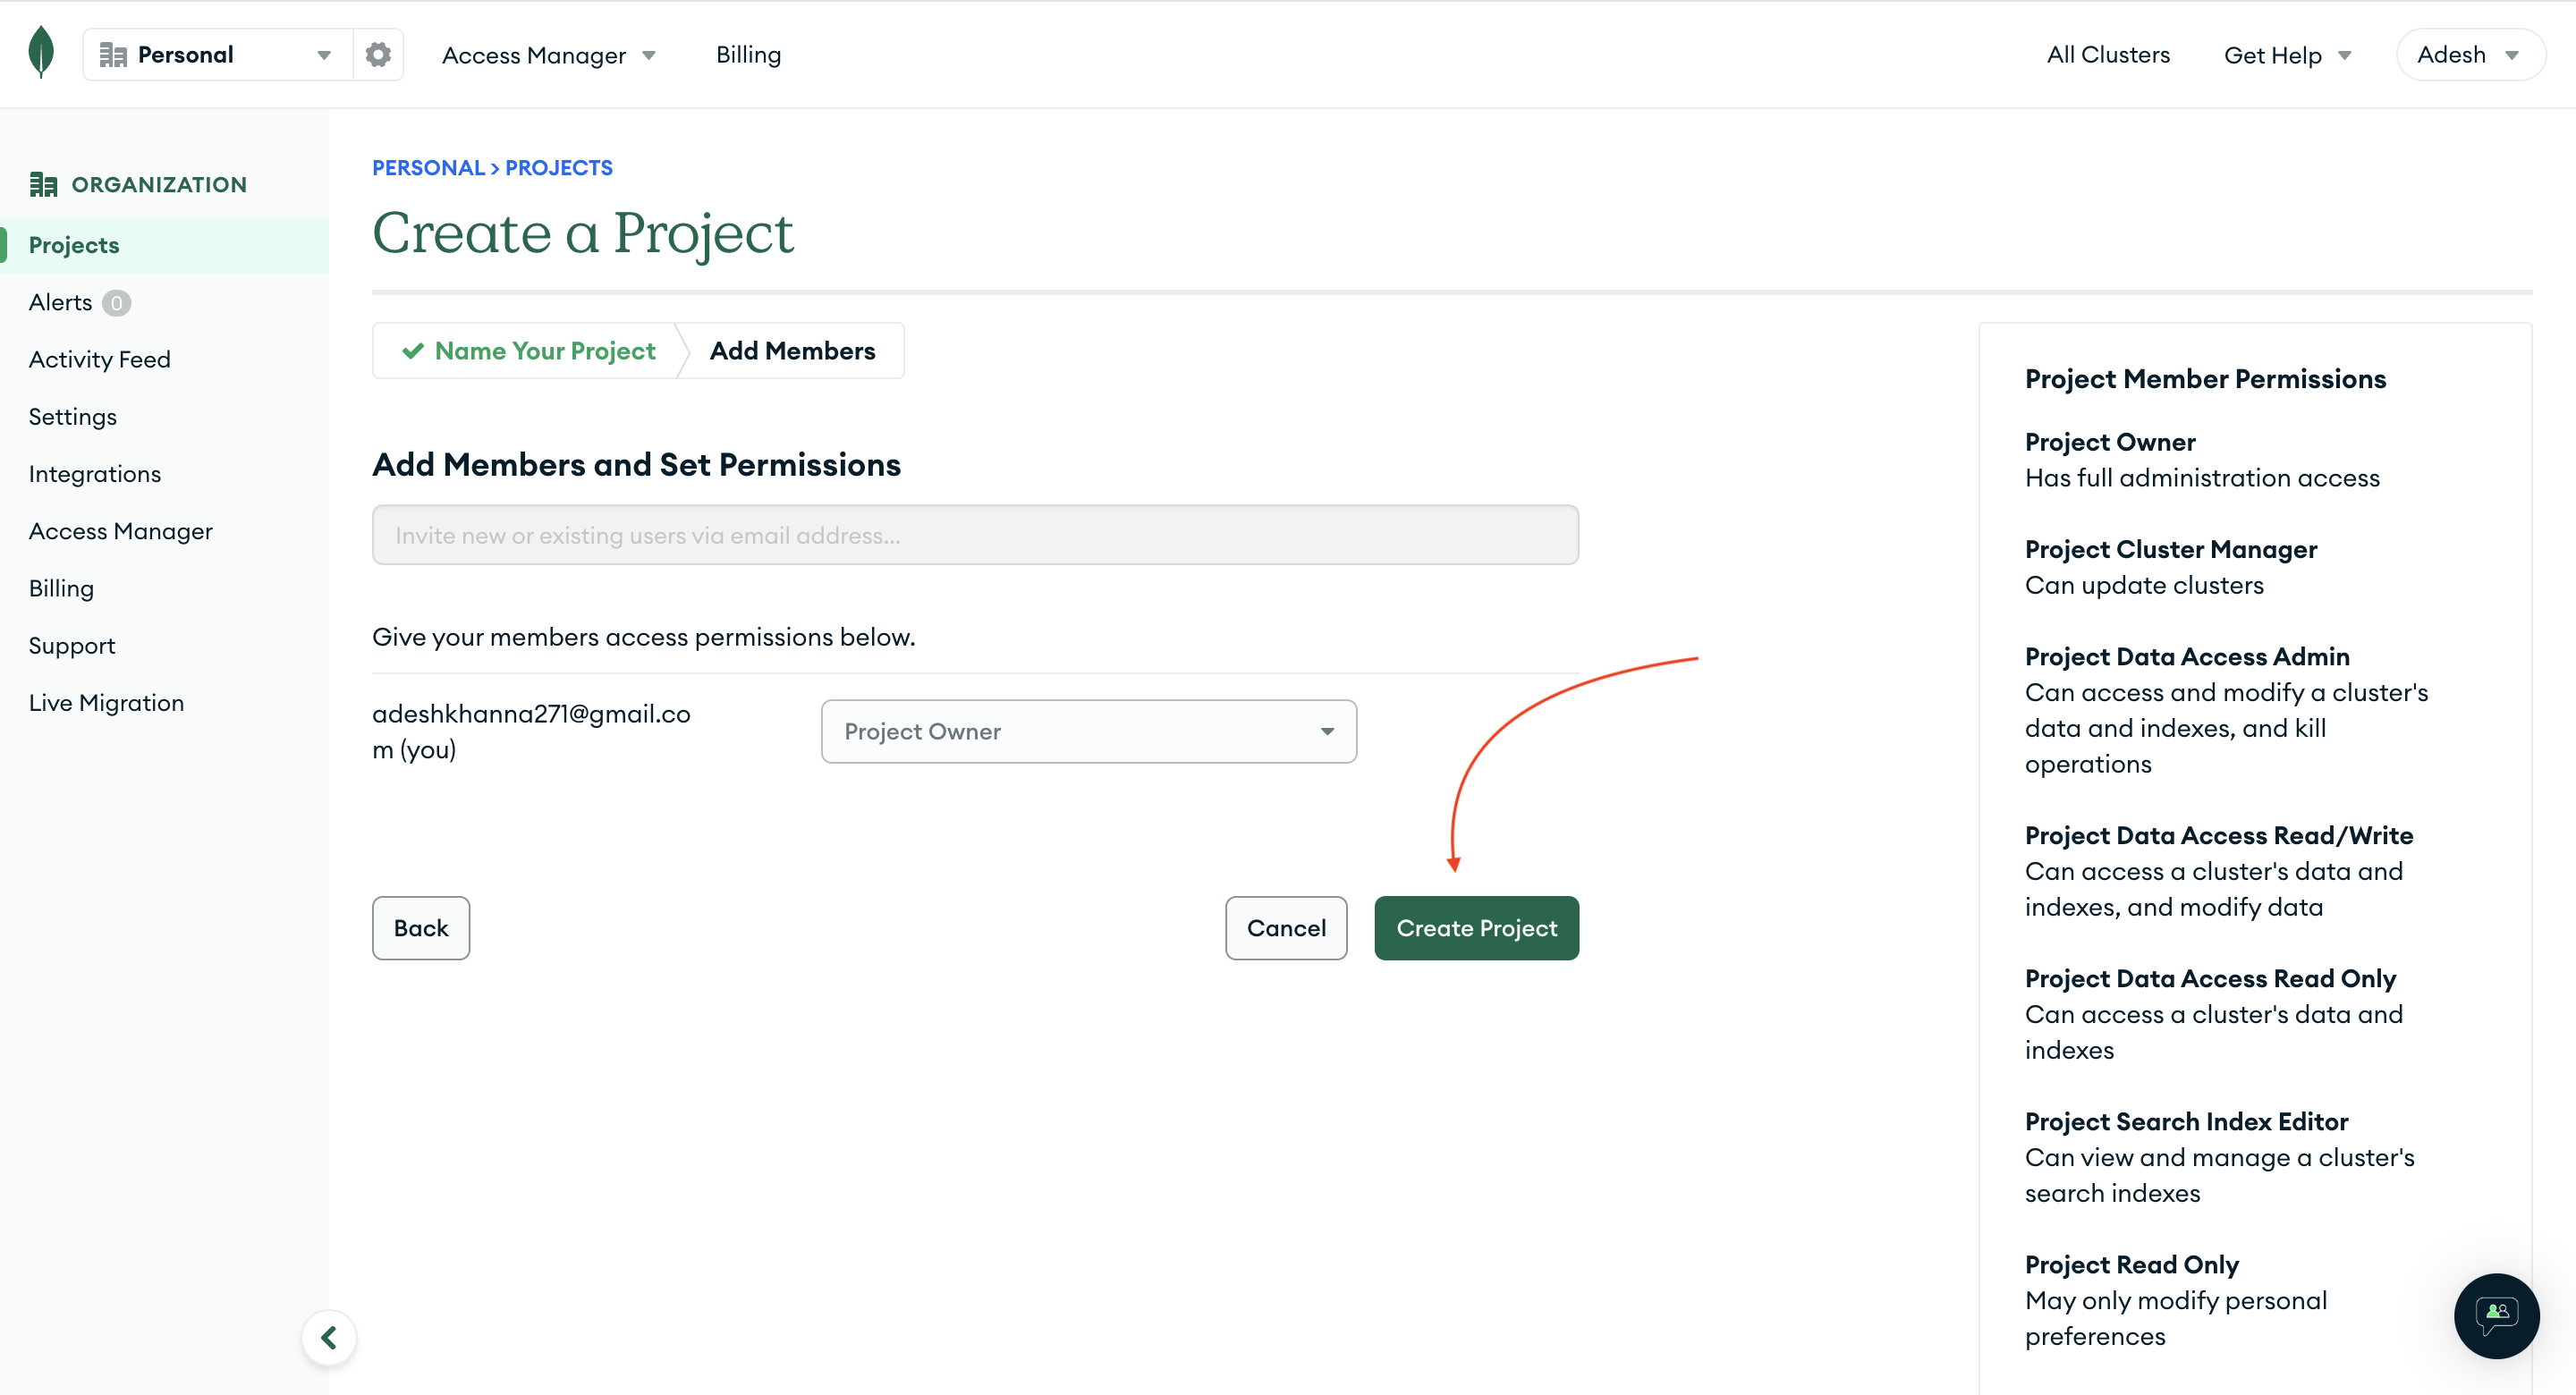
After that click on CREATE PROJECT
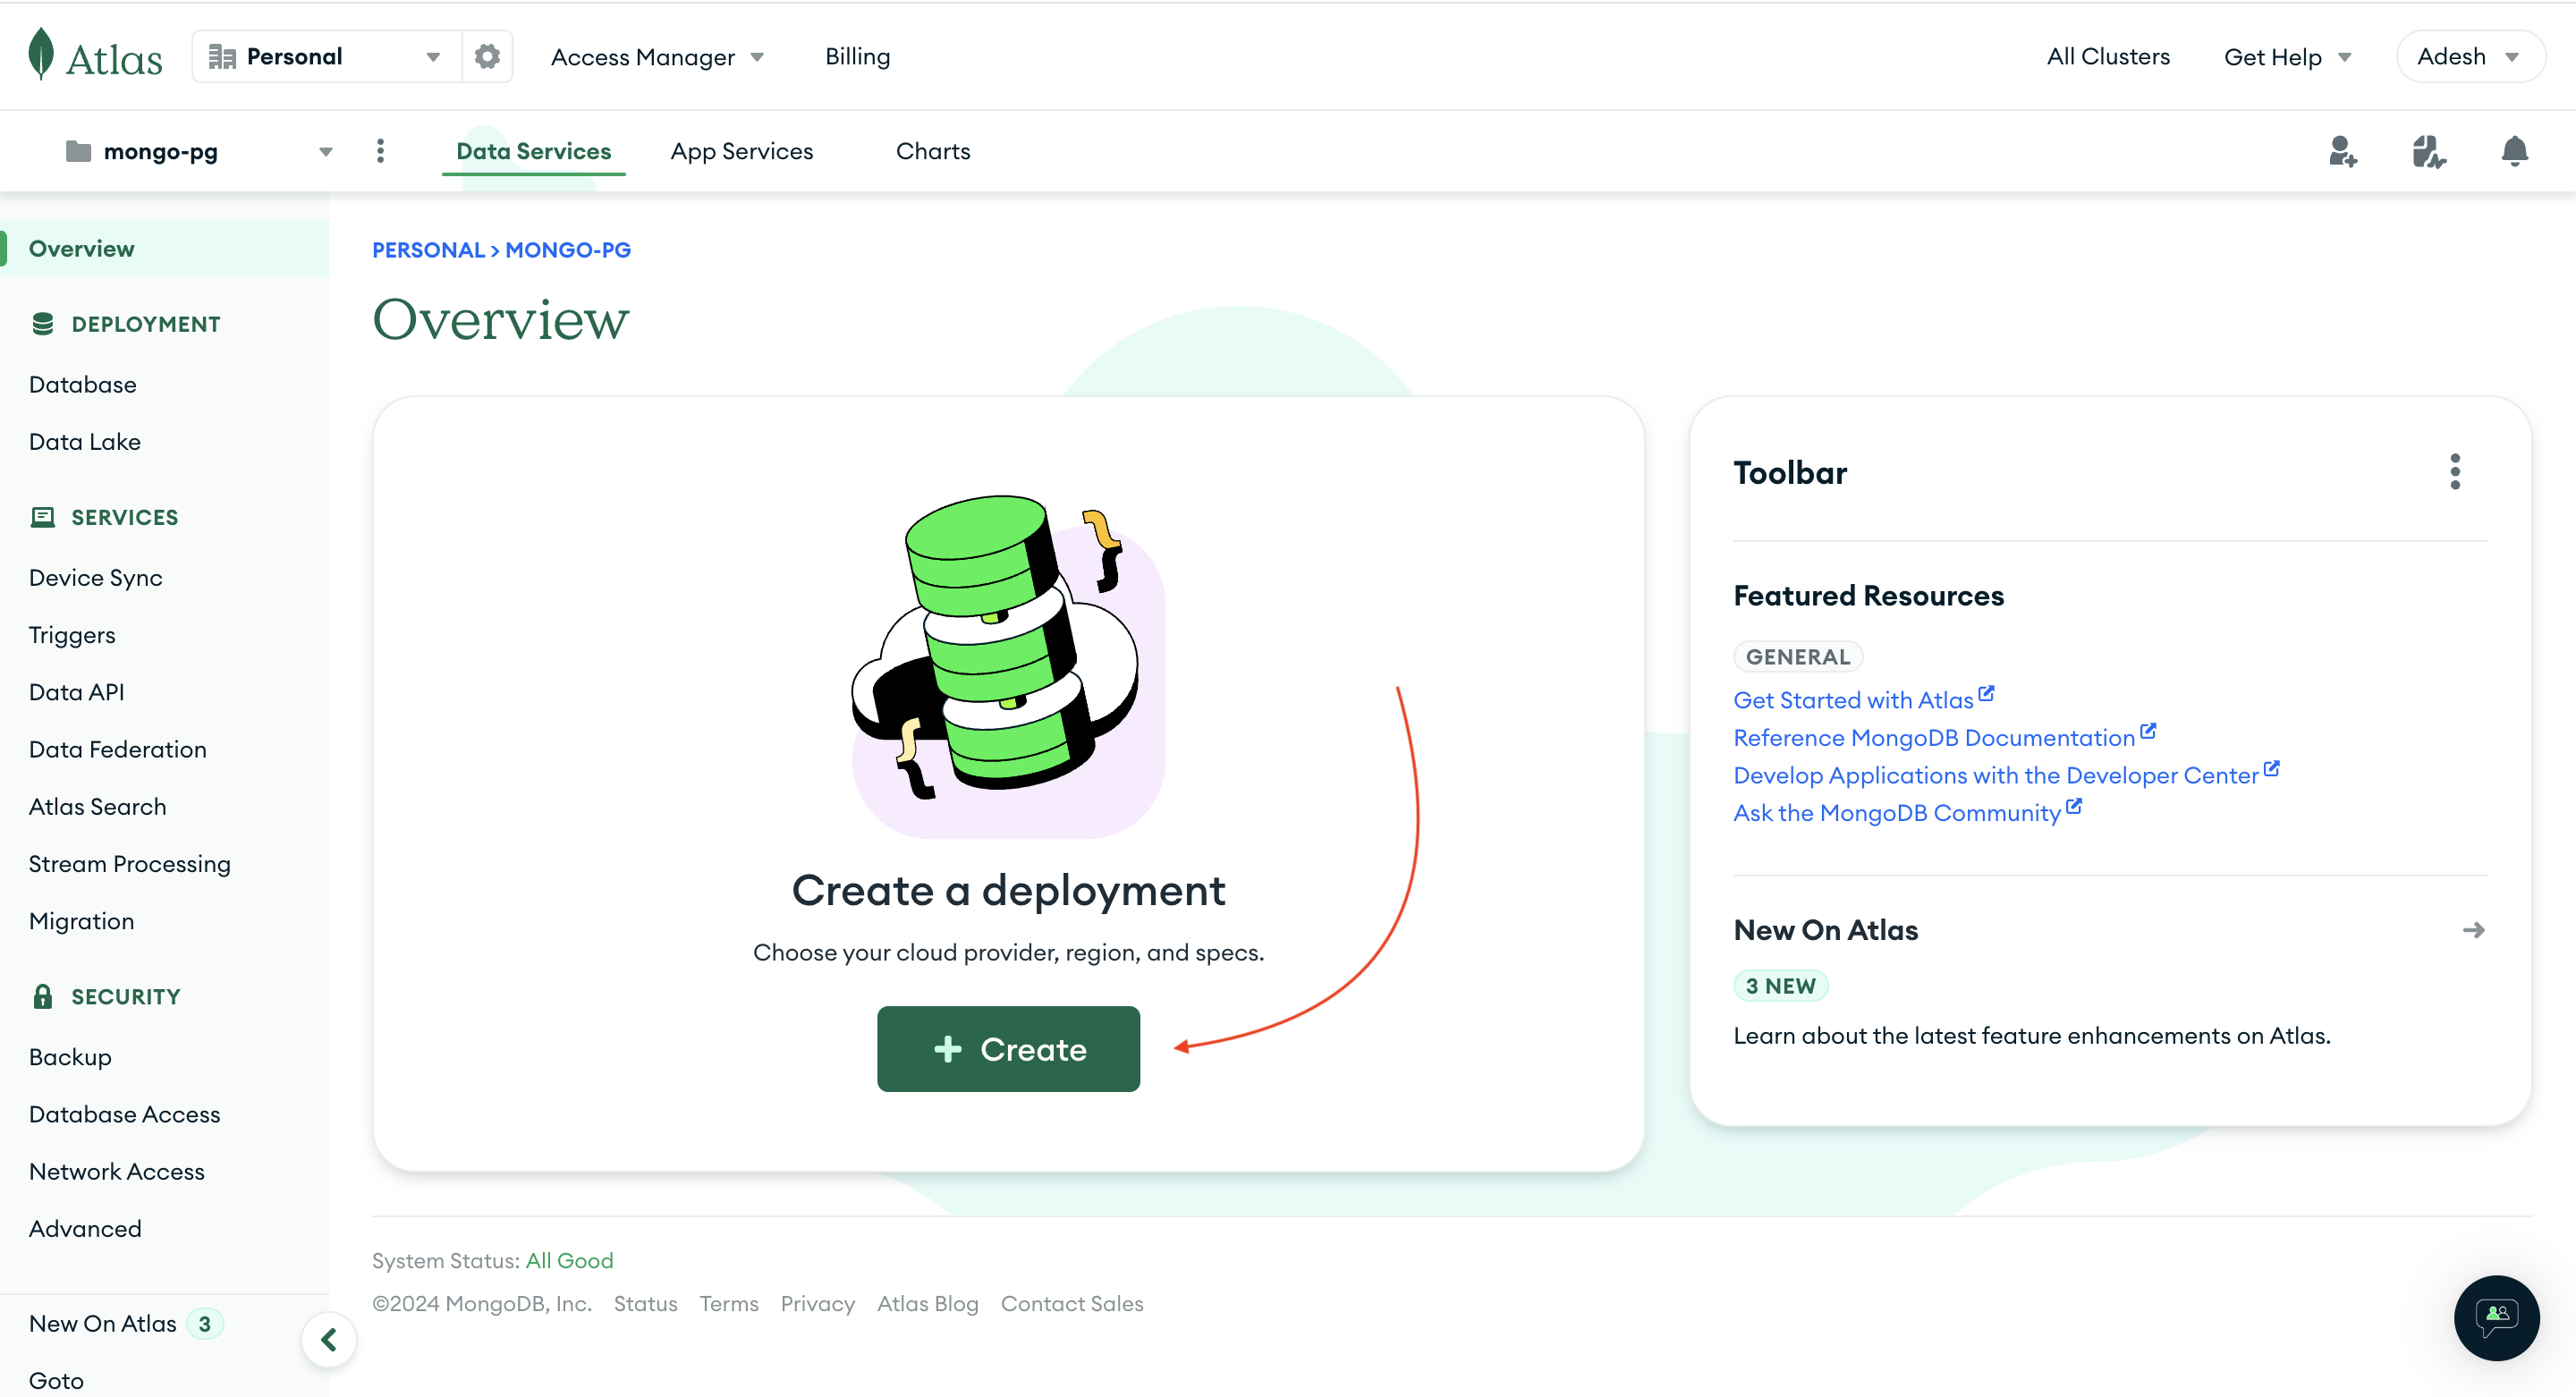
Now you will see a screen similar to this. Click on CREATE to create a new database.
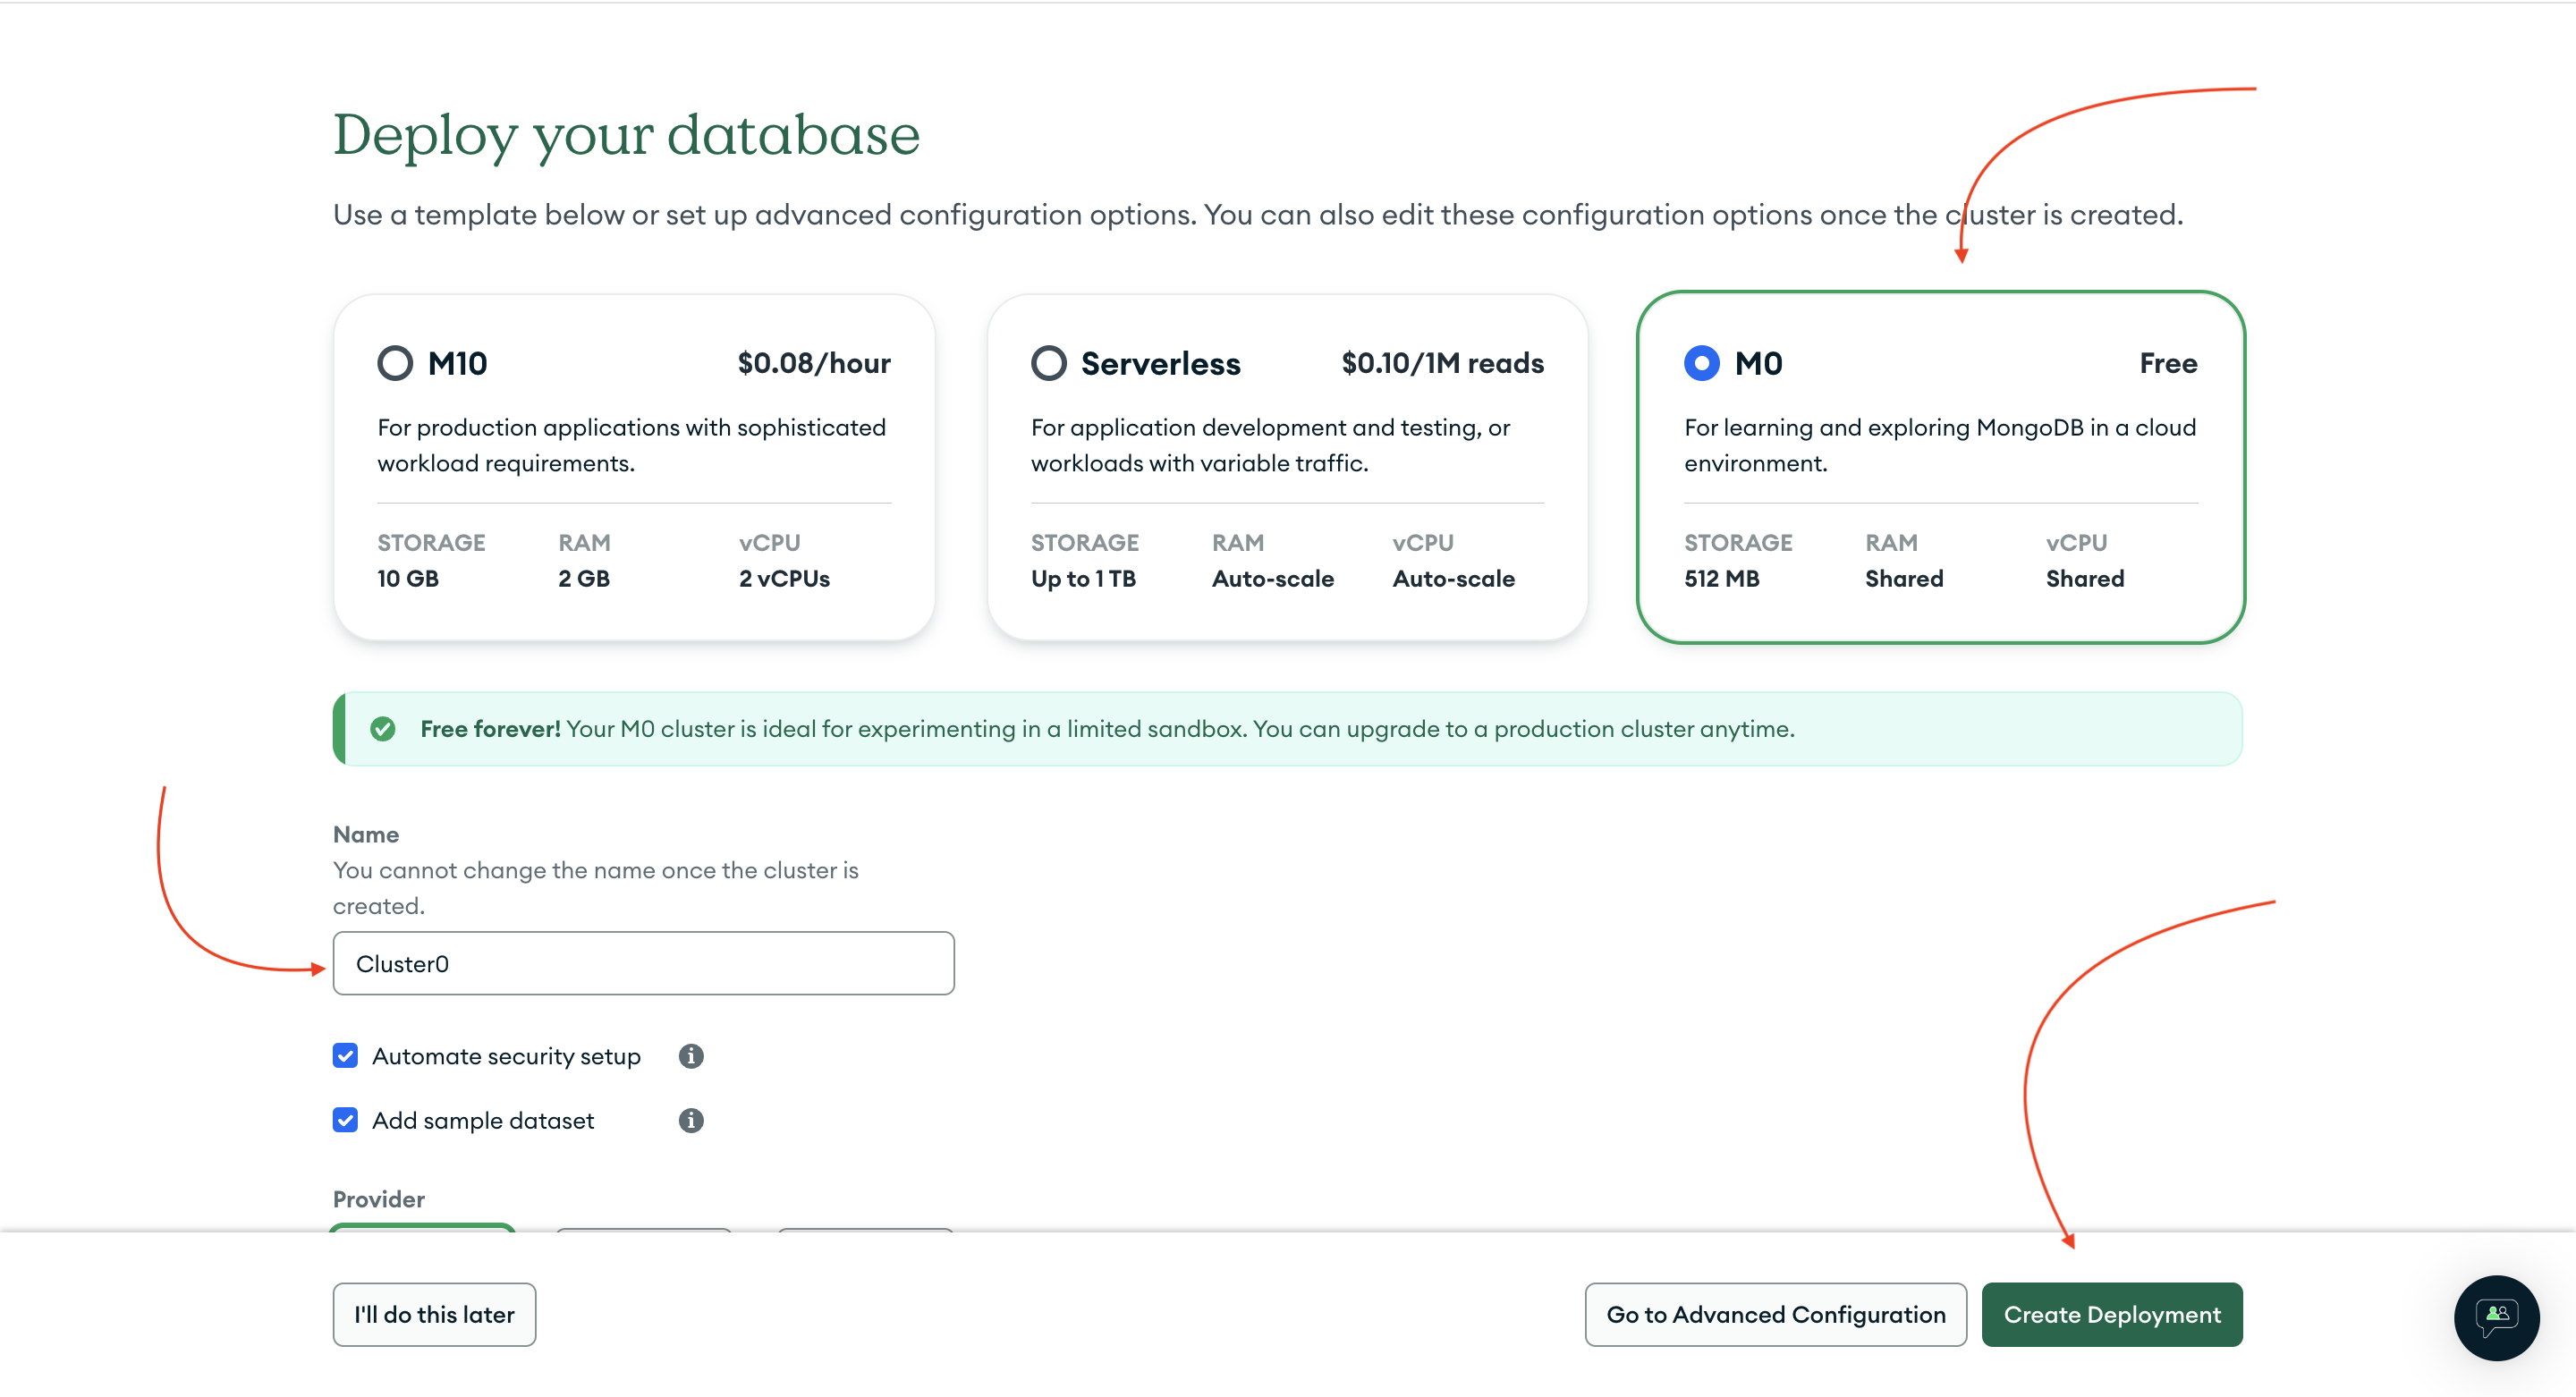
After that, a screen like this will appear. Click on FREE, give a name to your database, and then click on CREATE DEPLOYMENT.
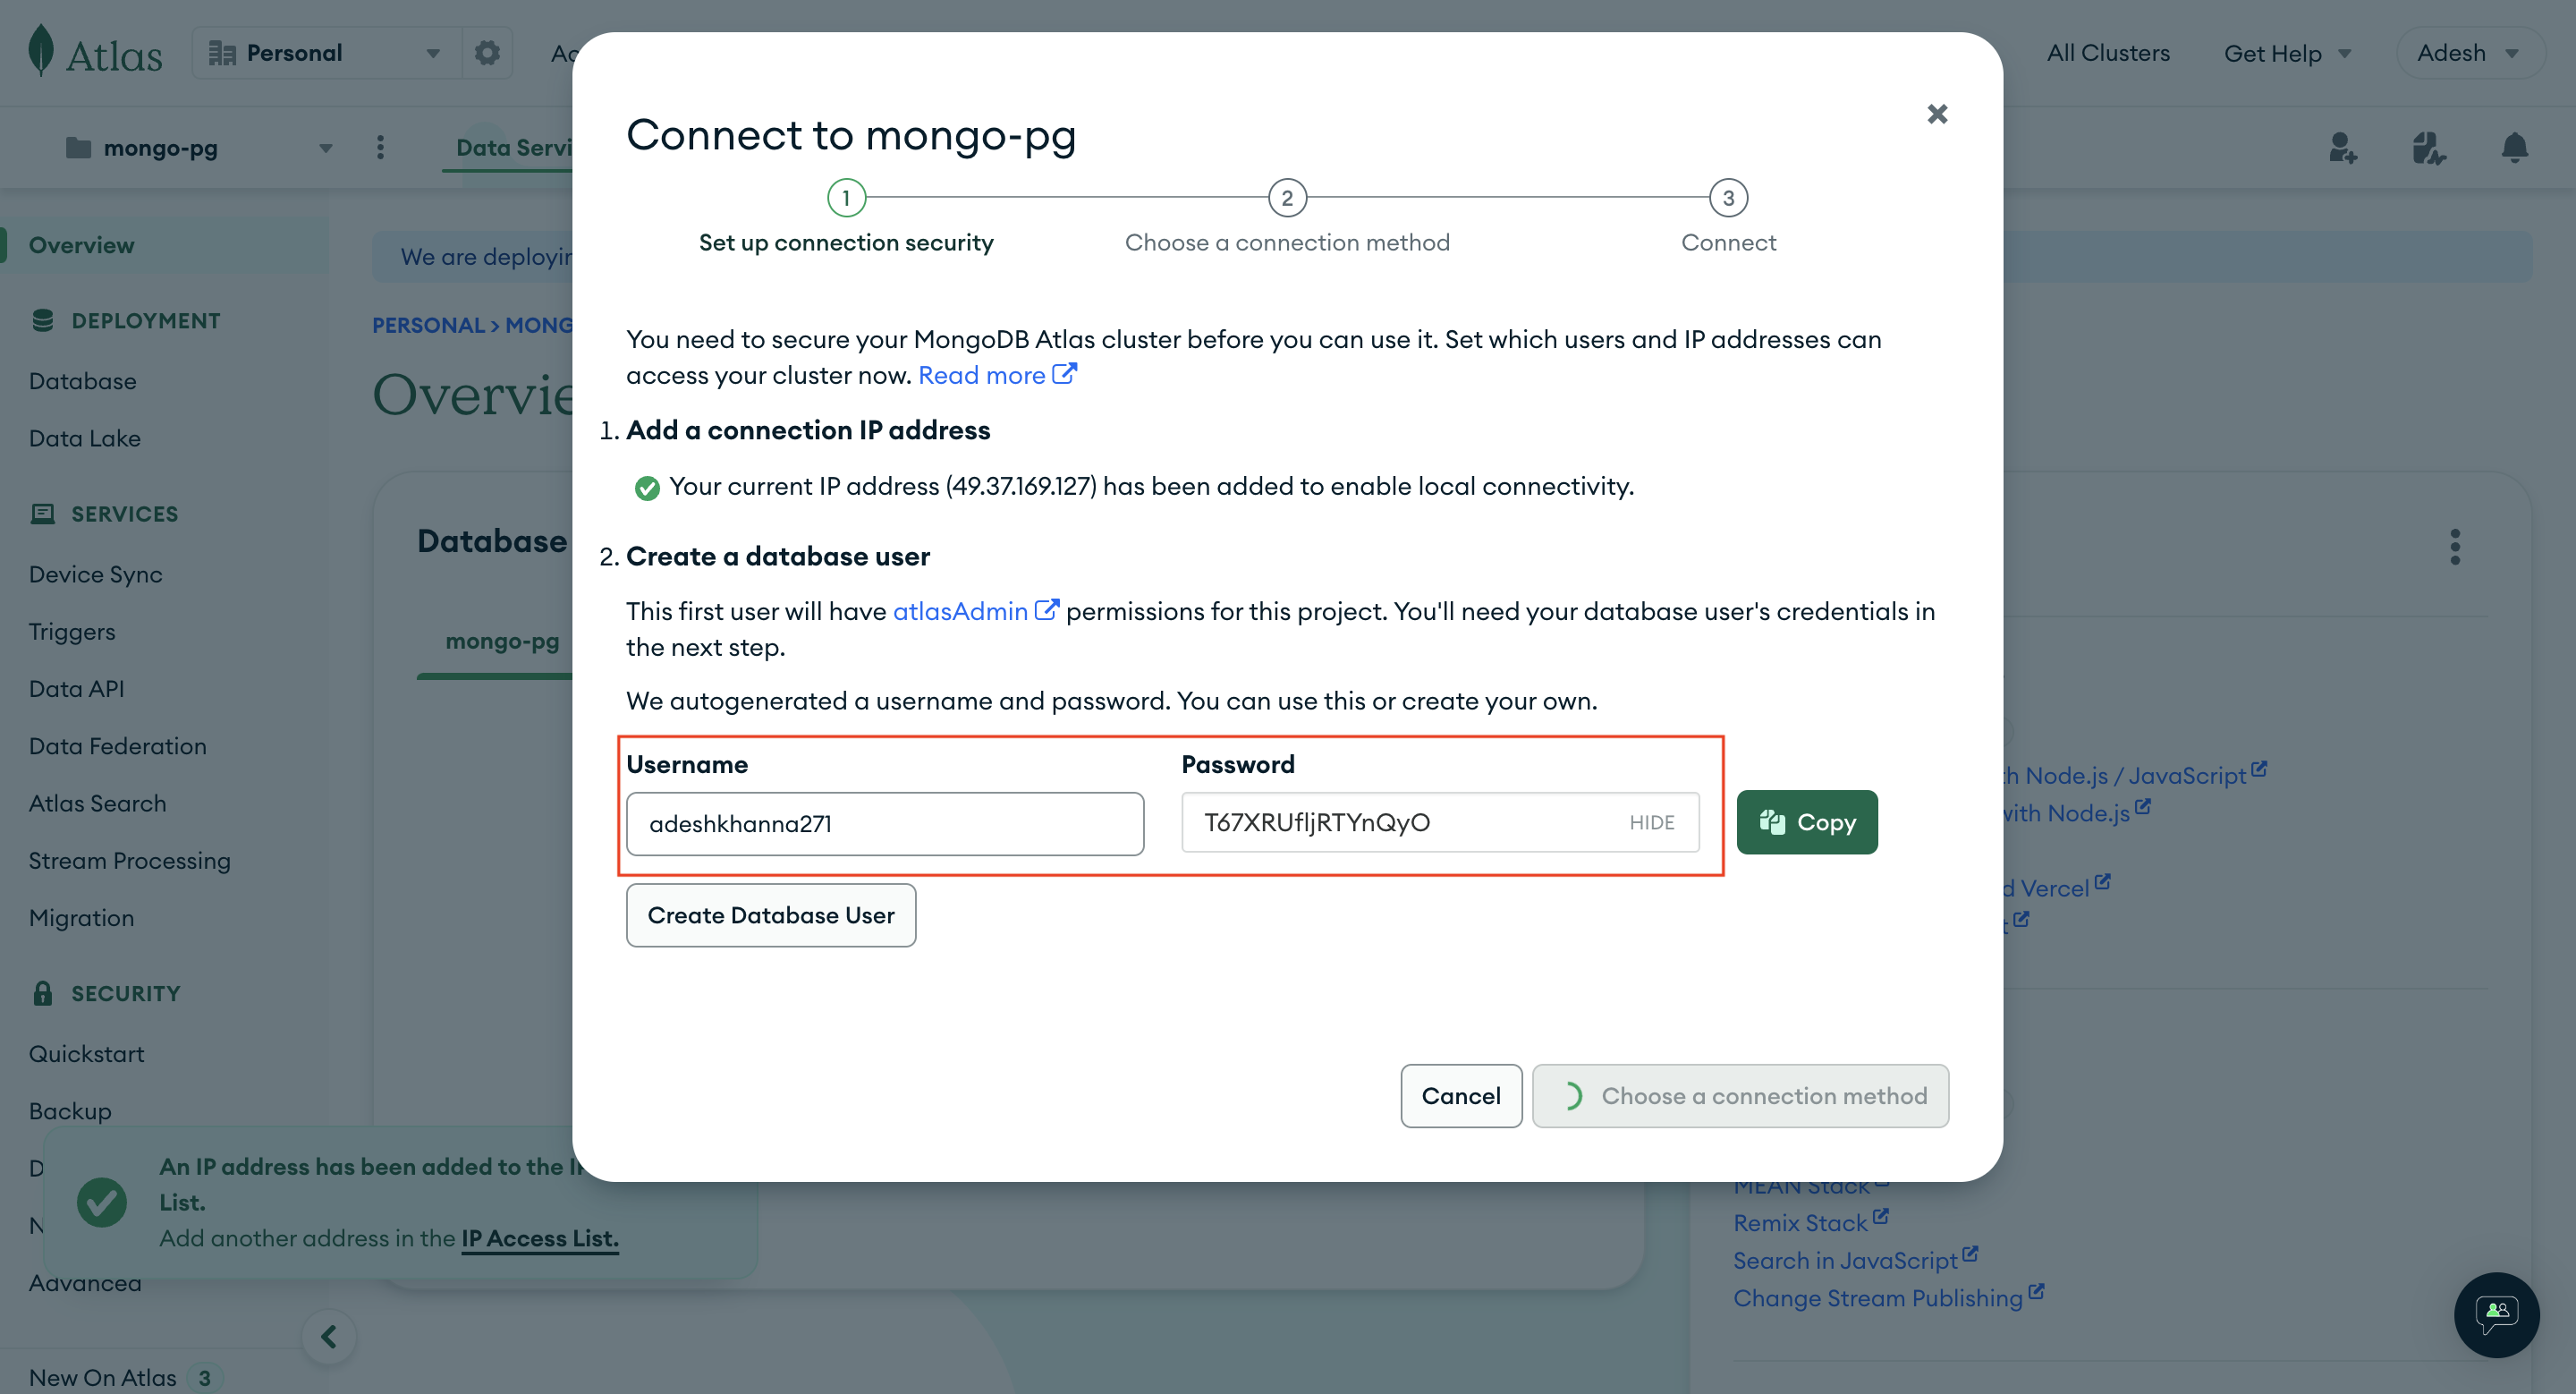
After that, you will see a popup like this. In it, your username and password will be displayed. Copy that information because we will use it to authenticate with our database locally. Then, click on CREATE DATABASE USER to create a user with that username and password. This will enable you to log in to the database and run queries.
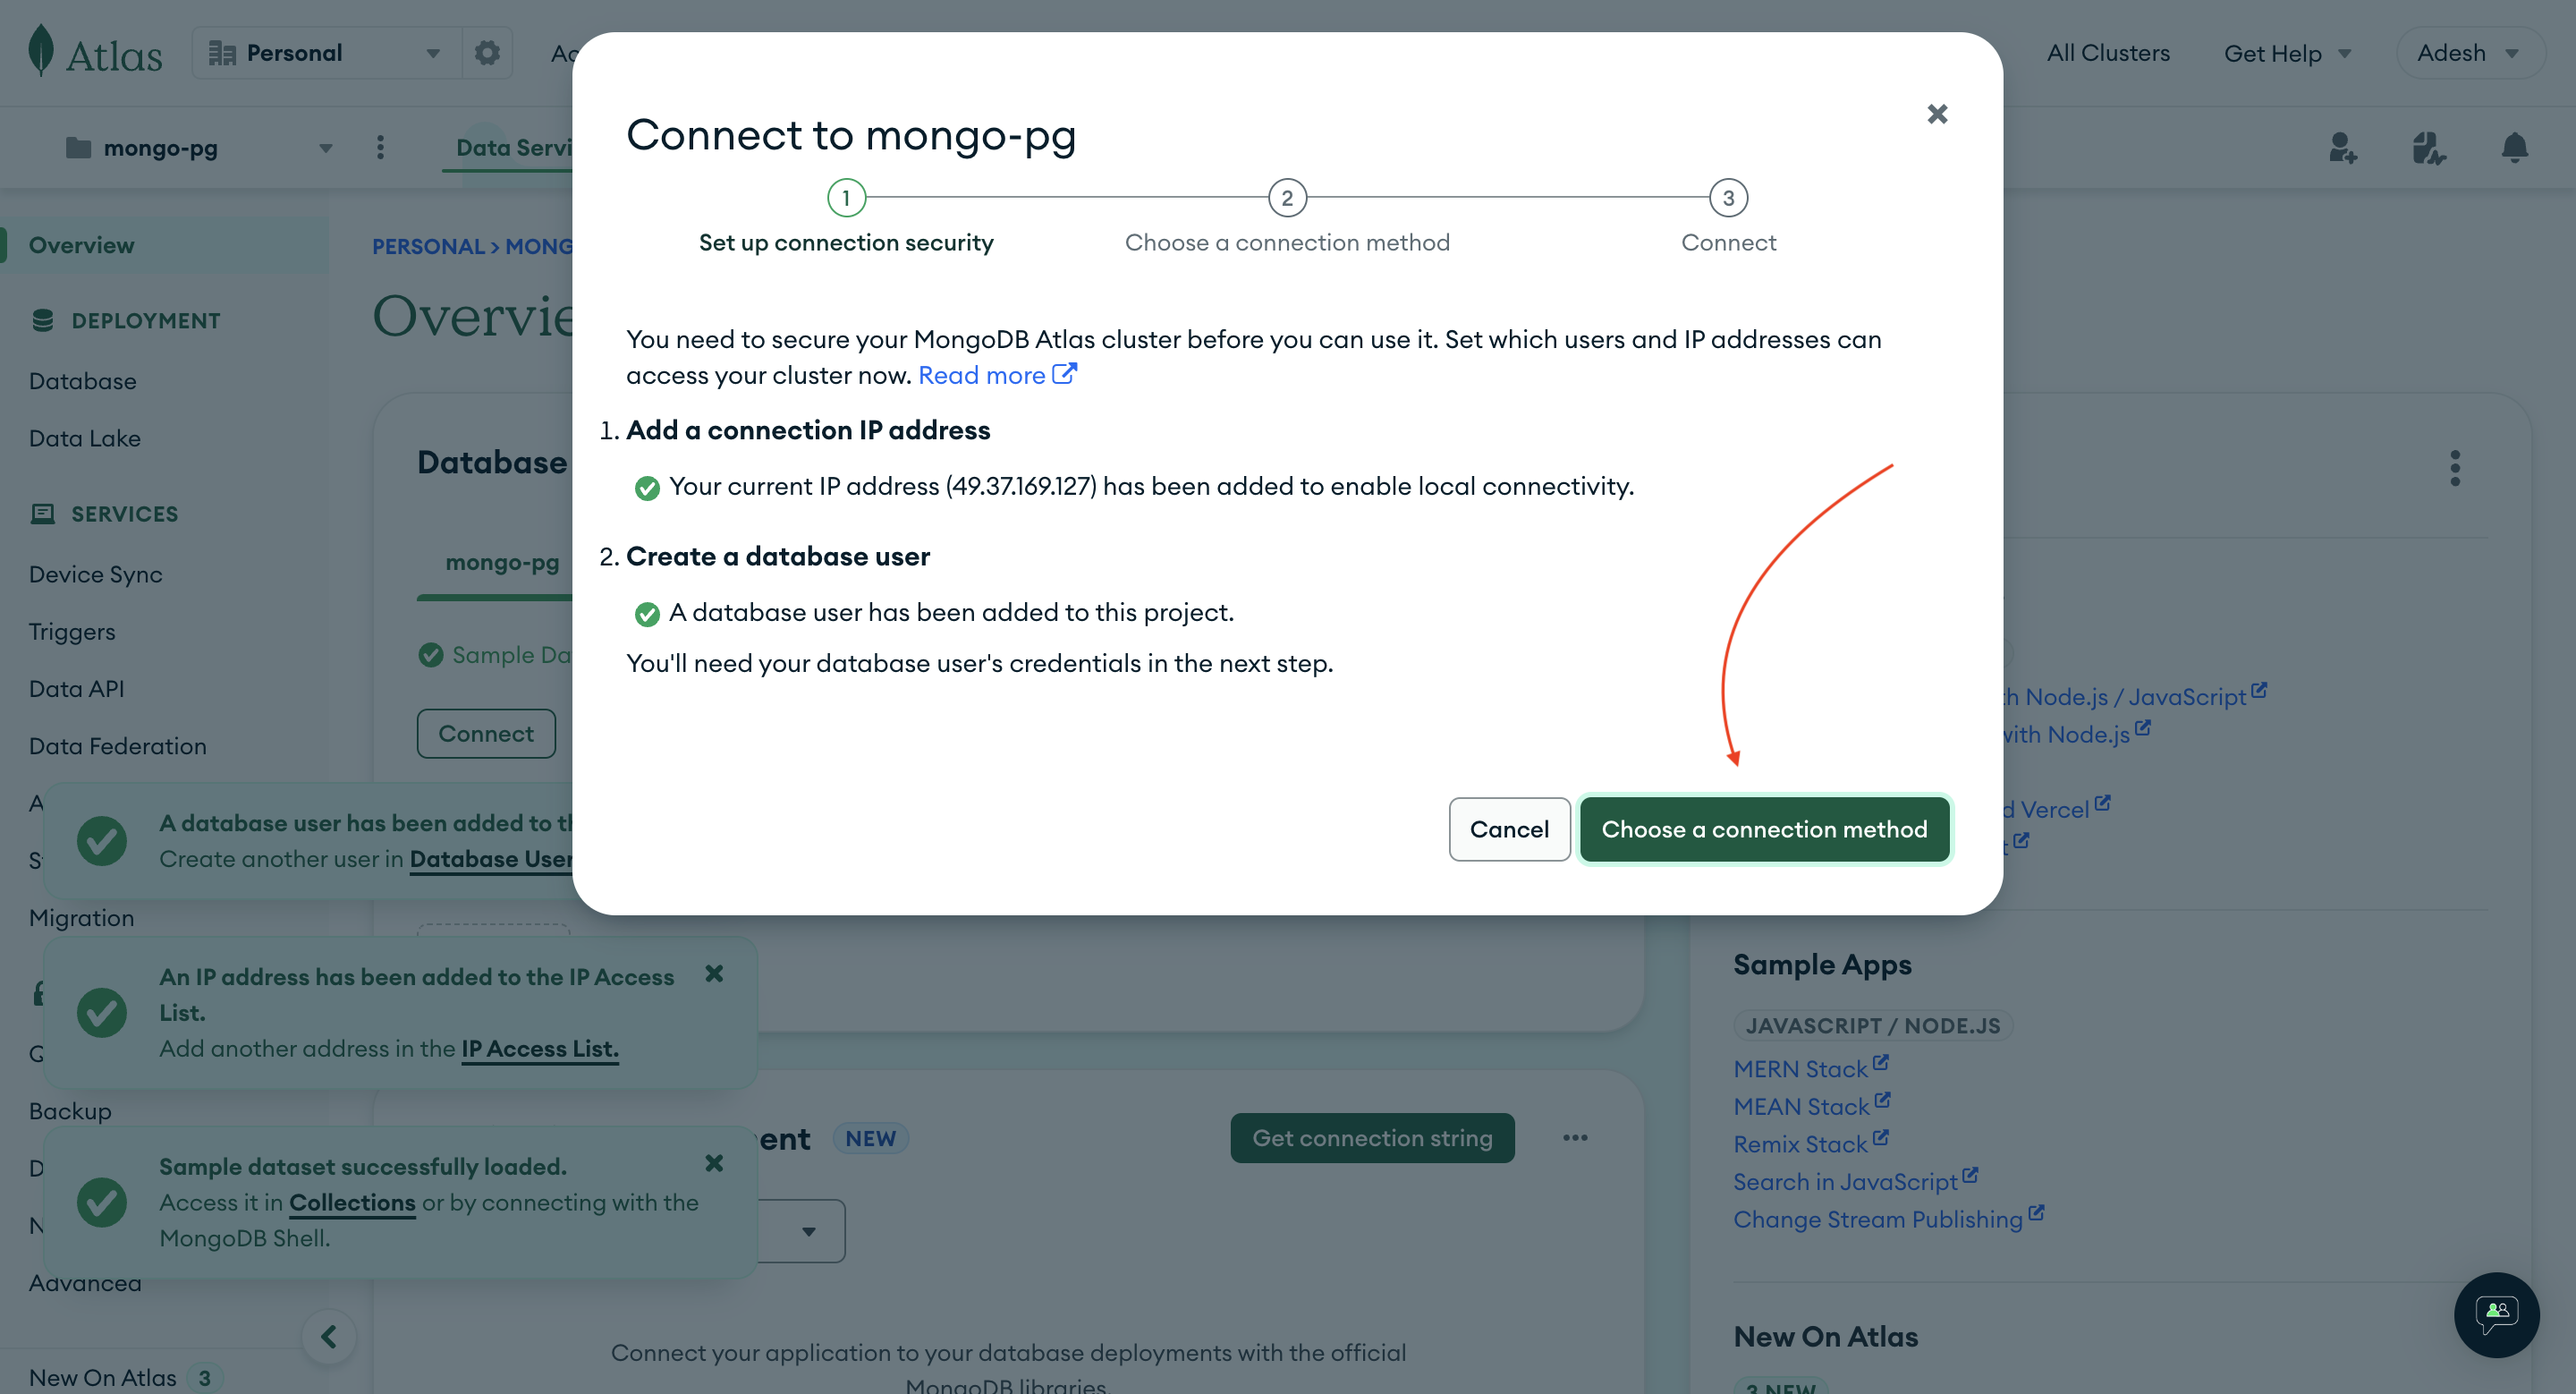
After that click on CHOOSE A CONNECTION METHOD.
Choose the first option
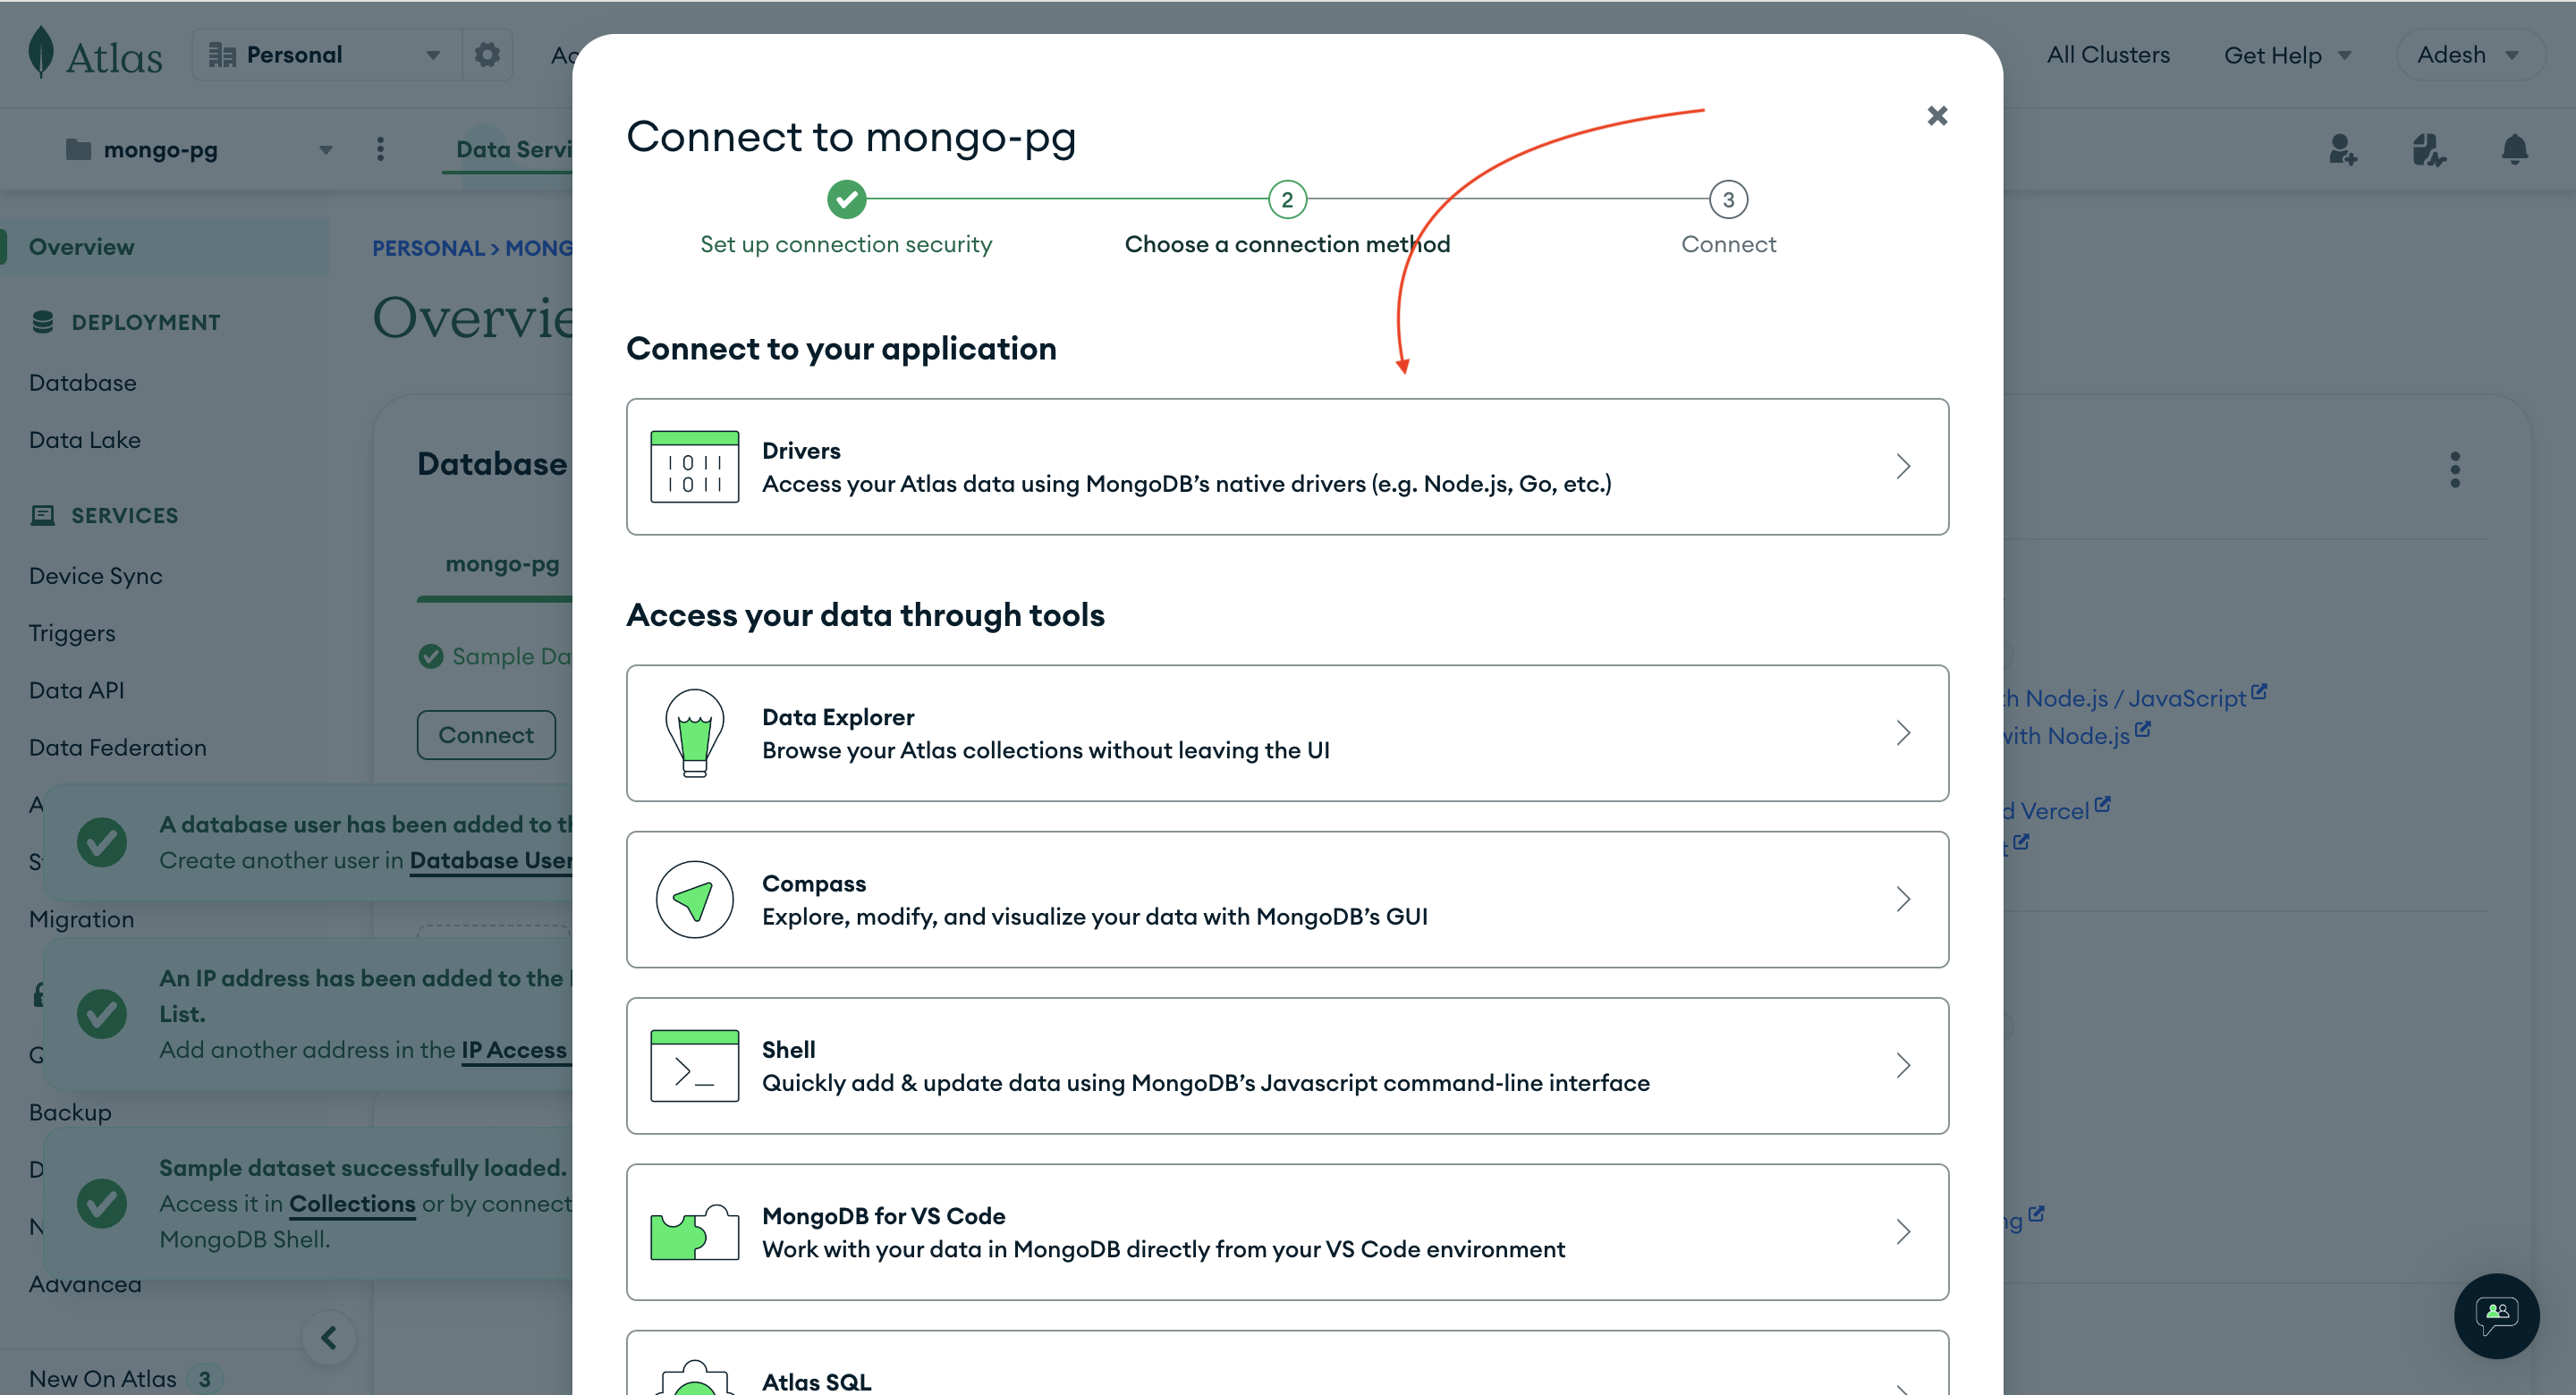
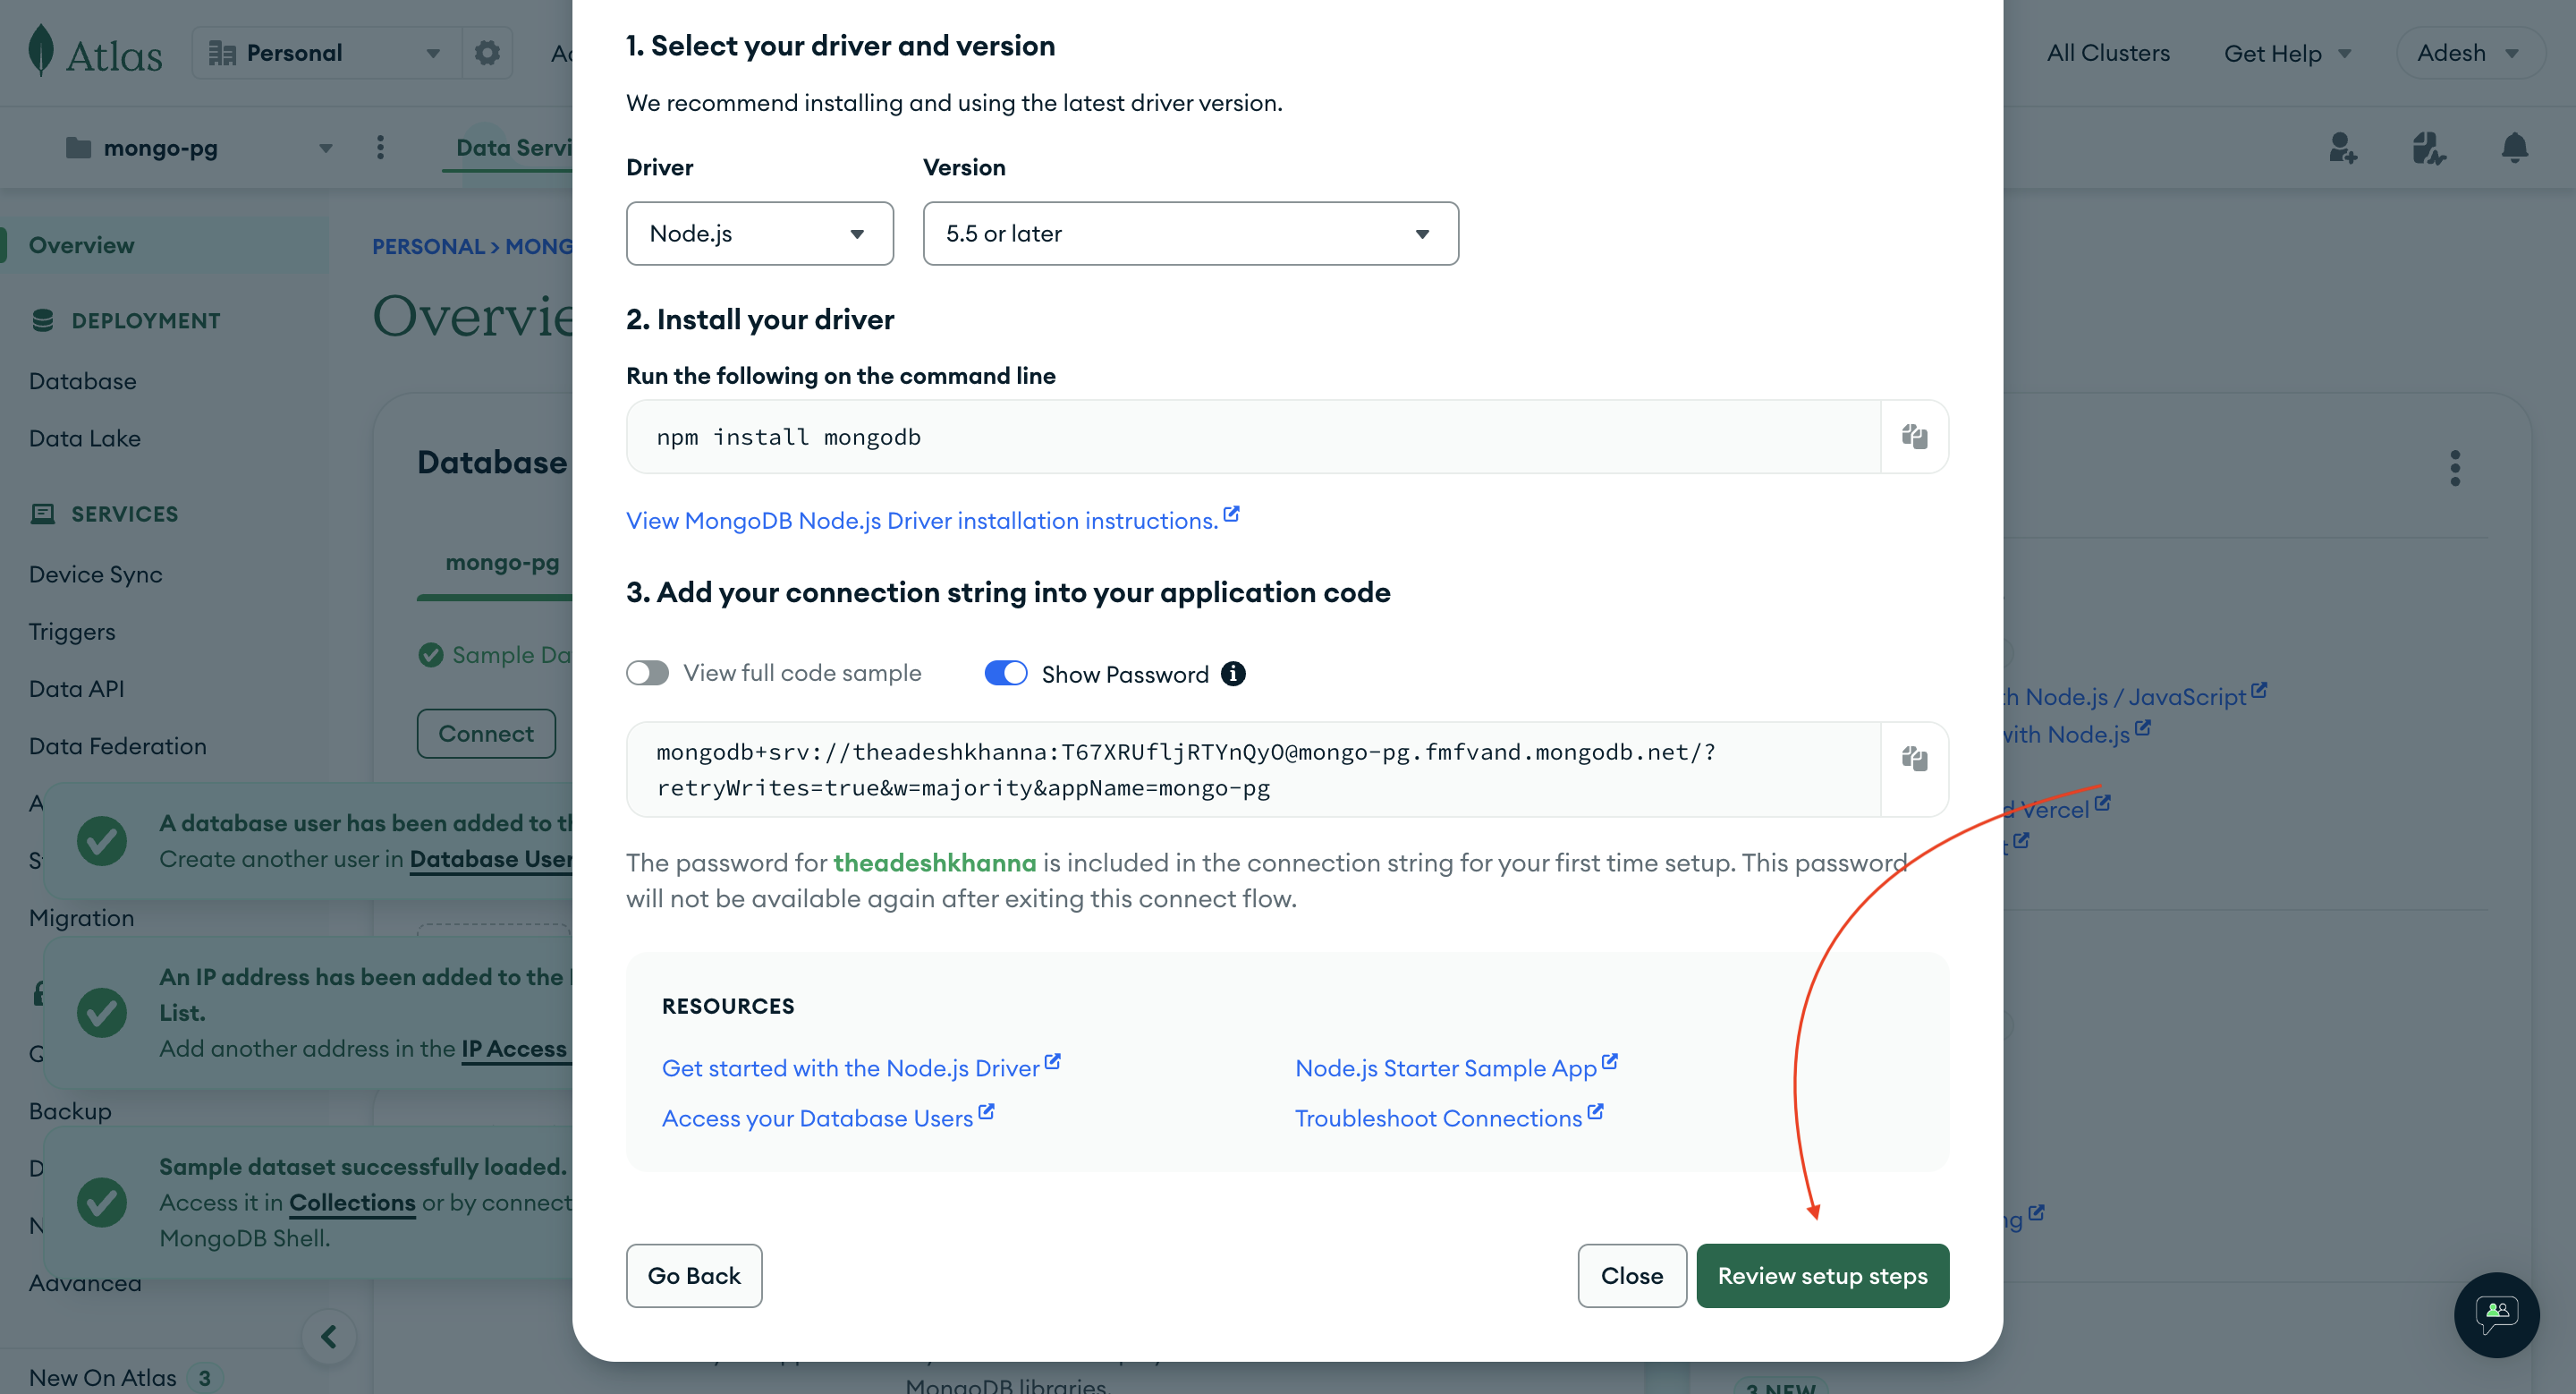
Now, it will provide instructions on how to connect to the database we just created using Node.js. You don't need to take any action at this point. I will explain how to do that later in this article. Simply scroll down and click on REVIEW SETUP STEPS.
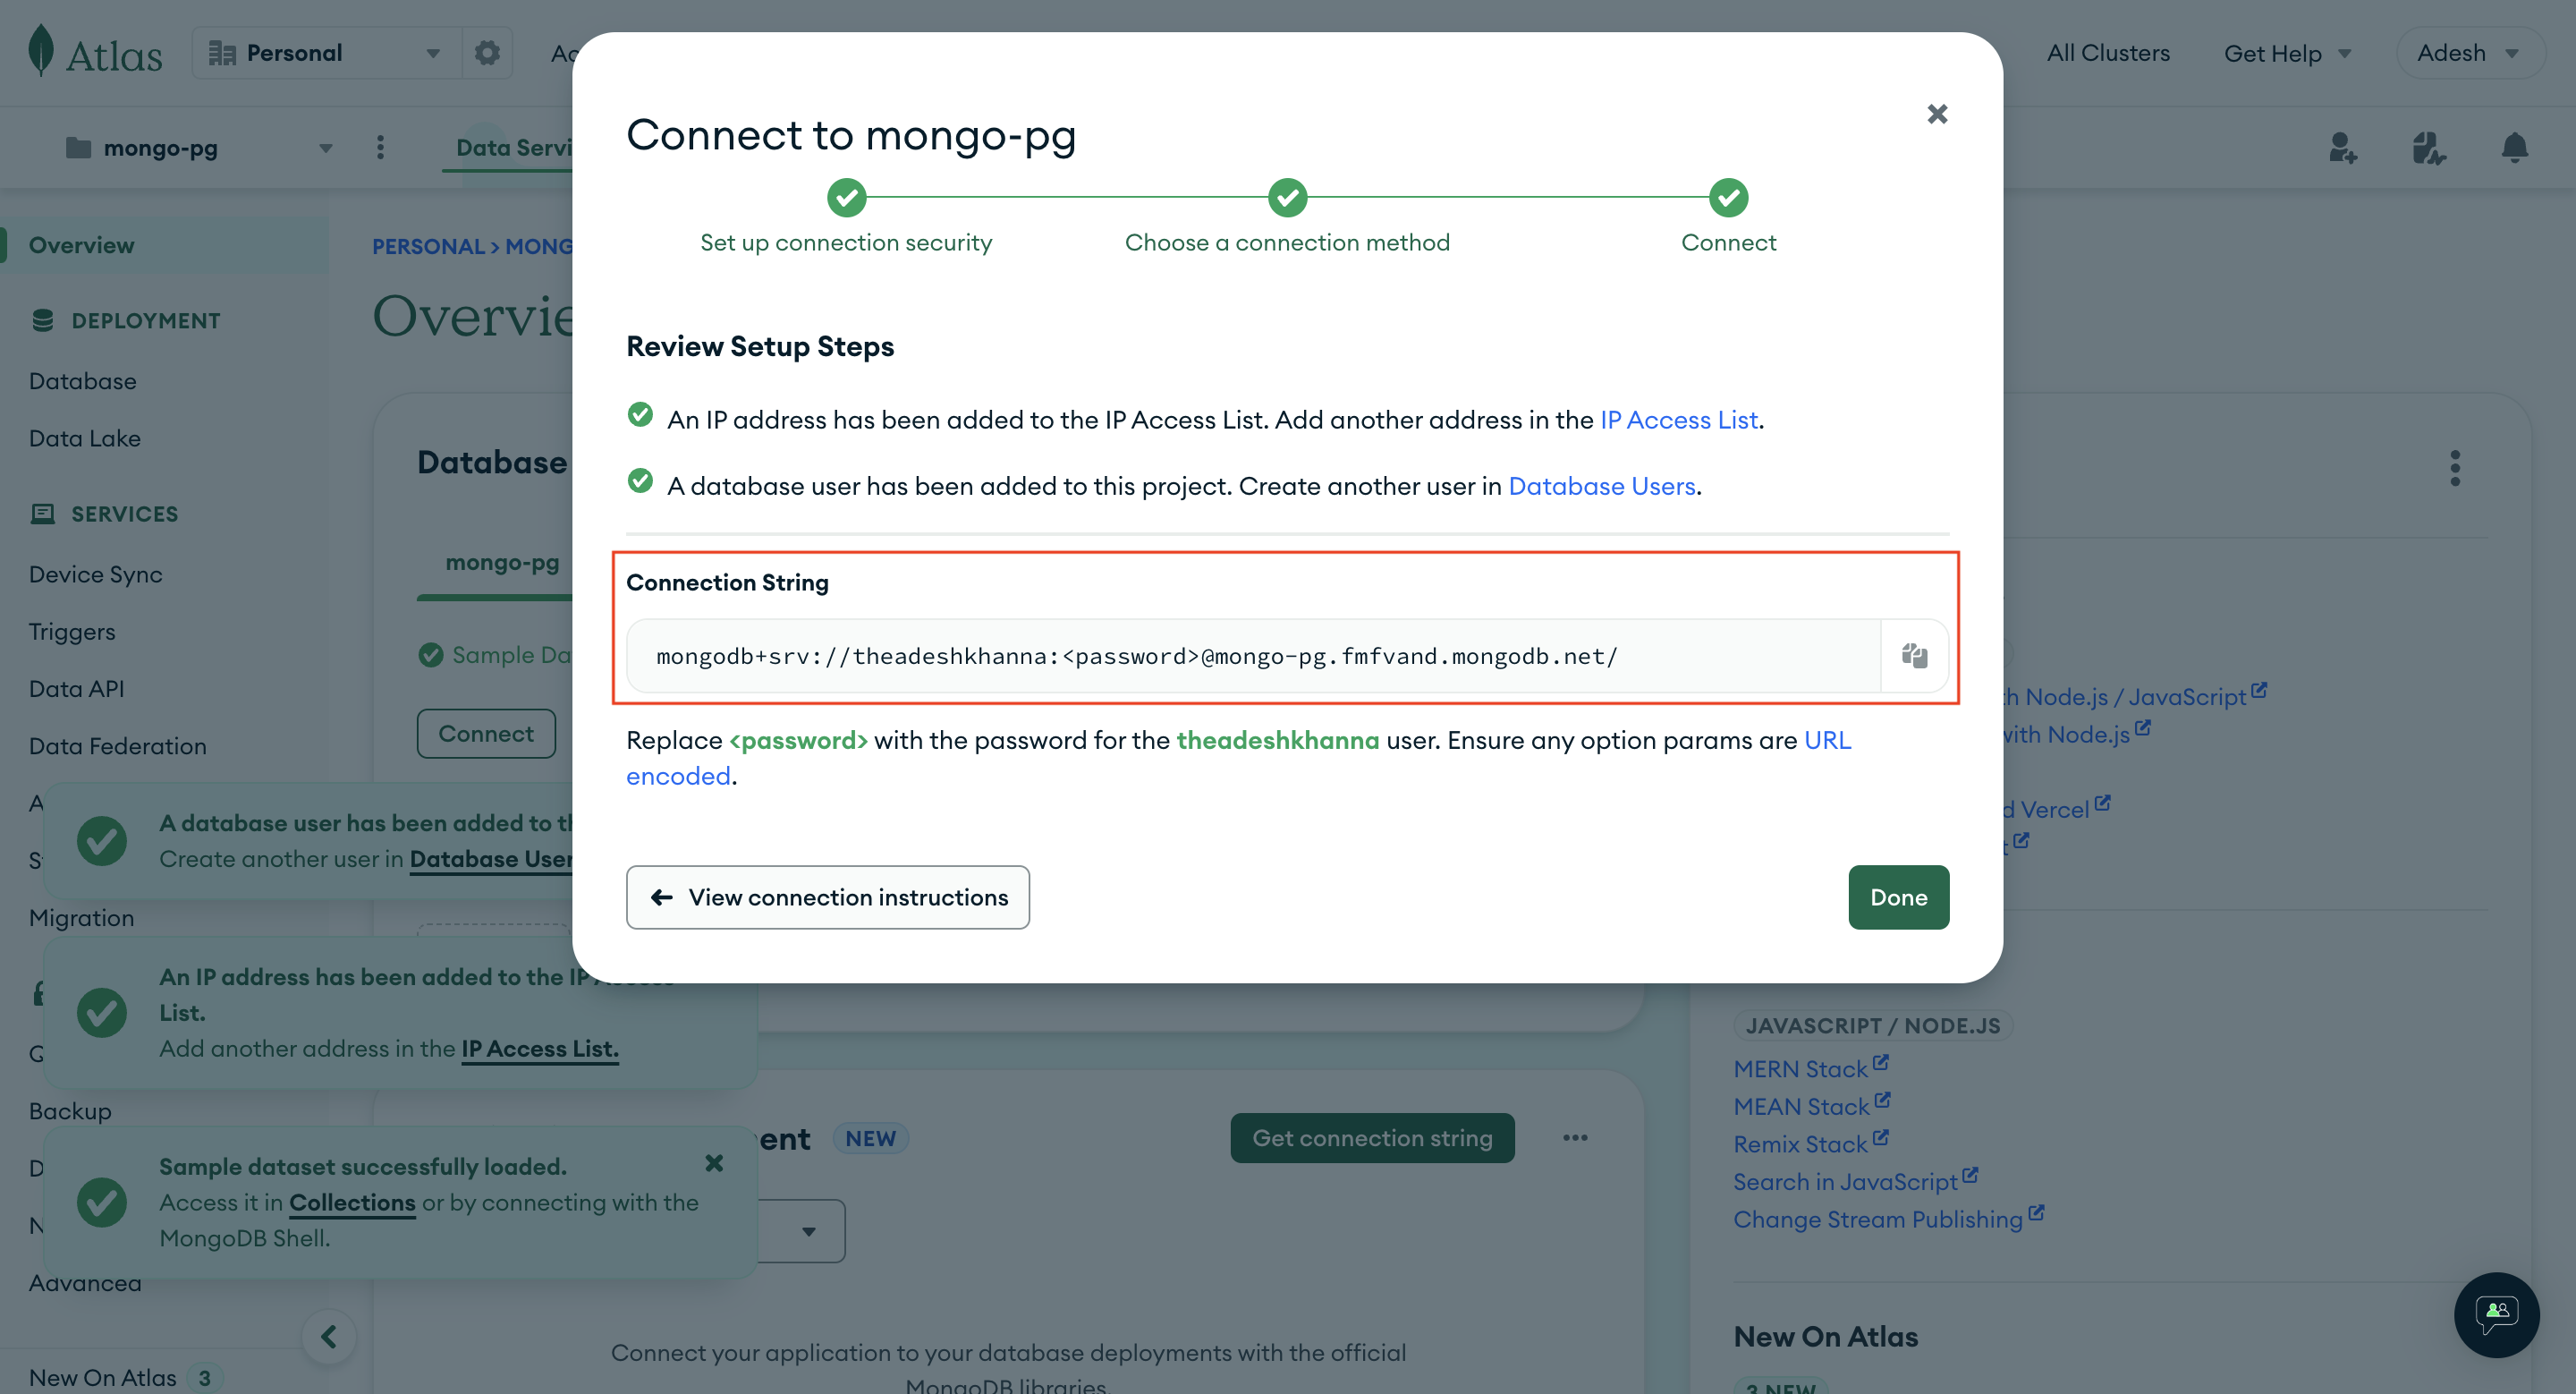
Now, copy the URL displayed here, as it will help us connect to the database we just created. Then, click DONE to close this popup.
STEP 2.2: Installing MongoDB and Mongoose
To use MongoDB we will install two npm packages - mongodb and the ORM mongoose, run the below npm command:
npm install mongodb mongoose
After installation, add the following variables to the .env file. Set their values to match those you copied while creating a database in MongoDB.
MONGO_USERNAME=adeshkhanna271
MONGO_PASSWORD=T67XRUfljRTYnQyO
MONGO_DB=mongo-pg
Now we will be creating a new file in directory called as db.js, here we will intialize our database setup and then use that in our server.js
const mongoose = require("mongoose");
const dotenv = require("dotenv");

dotenv.config(); // Load environment variables from .env

// MongoDB connection URL
const url = `mongodb+srv://${process.env.MONGO_USERNAME}:${process.env.MONGO_PASSWORD}@${process.env.MONGO_DB}.fmfvand.mongodb.net/`;

// Function to establish the database connection
const initializeDatabase = async () => {
  try {
    await mongoose.connect(url);
    console.log("Connected to the database");
  } catch (error) {
    console.error("Error connecting to the database:", error);
    throw error;
  }
};

module.exports = initializeDatabase;
After that we will modify our server.js to use above initializeDatabase() method, so it will look something like this:
const express = require("express");
const initializeDatabase = require("./db");

const app = express();
const port = process.env.PORT || 1667;

initializeDatabase()
  .then(() => {
    app.use(express.json());

    // Start the server
    app.listen(port, () => {
      console.log(`Server is running on port ${port}`);
    });
  })
  .catch((error) => {
    console.error("Database connection failed:", error);
  });
STEP 3: Models
STEP 3.1: Creating the Models
Models are the means by which we define our schema. Therefore, create a directory called models, and within it, create a file named book.model.js
const mongoose = require("mongoose");

const GenreEnum = [
  "Fiction",
  "Nonfiction",
  "Science Fiction",
  "Fantasy",
  "Mystery",
];

const BookSchema = mongoose.Schema(
  {
    title: {
      type: String,
      required: [true, "Please enter the title of book"],
    },

    author: {
      type: String,
      required: [true, "Please enter the author of book"],
    },

    price: {
      type: Number,
      required: [true, "Please enter the price of book"],
    },

    genre: {
      type: String,
      enum: GenreEnum,
    },
  },
  {
    timestamps: true,
  }
);

const Book = mongoose.model("Book", BookSchema);
module.exports = Book;
STEP 4: Creating Routes and Controllers
STEP 4.1: Creating the controllers
Now we will create the controller, which will contain the actual logic for our application. Create a directory called controllers and add book.controller.js. Then, add the following methods to it. We will add the logic later on.
// These are the basic skeleton of all the methods that we will be
// writing now, i.e. to create, update, get and delete Books from
// table.
const createBook = async (req, res) => {}

const updateBook = async (req, res) => {}

const getBook = async (req, res) => {}

const getAllBook = async (req, res) => {}

const deleteBook = async (req, res) => {}

module.exports = {
    createBook: createBook,
    updateBook: updateBook,
    getBook: getBook,
    getAllBook: getAllBook,
    deleteBook: deleteBook
}
STEP 4.2: Creating the Routes
Routes determine how our routing will take place. To achieve this, create a routes directory and add a file named book.route.js within it. Then, include the following code in that file.
const express = require("express");
// fetching router from the express
const bookRouter = express.Router();

// fetching all the controller methods, to call and create API for
// each one of them
const {
  createBook,
  updateBook,
  getBook,
  getAllBook,
  deleteBook,
} = require("../controllers/book.controller");

bookRouter.post("/", createBook);
bookRouter.put("/:id", updateBook);
bookRouter.get("/:id", getBook);
bookRouter.get("/", getAllBook);
bookRouter.delete("/:id", deleteBook);

// exporting the router as BookRoute so that it can be easily
// identified in baseRoute
module.exports = bookRouter;
after that create a base.route.js which will contain all the routes of all models, which will look something like this -
const express = require("express");
const bookRouter = require("./book.route");
const baseRouter = express.Router();

baseRouter.use("/books", bookRouter);

module.exports = baseRouter;
STEP 4.3: Server.js Modifications
Now, we will update server.js to incorporate these changes -
const express = require("express");
const initializeDatabase = require("./db");
const baseRouter = require("./routes/base.route");

const app = express();
const port = process.env.PORT || 1667;

initializeDatabase()
  .then(() => {
    app.use(express.json());
    app.use("/api", baseRouter);

    // Start the server
    app.listen(port, () => {
      console.log(`Server is running on port ${port}`);
    });
  })
  .catch((error) => {
    console.error("Database connection failed:", error);
  });
STEP 5: Adding Validations
Validations are employed to ensure that the data sent to or retrieved from the server is accurate, complete, and conforms to a set of predefined rules or criteria.
In our project, we will be utilizing Validator.js for this purpose. You can install it as follows:
npm i validatorjs
To utilize this, we will create a folder named validators. Within this folder, we will create separate files for each API.
STEP 5.1: The Create Validator
const validator = require("validatorjs");

// creating a method which will take the incoming data and based on
// rules, it will tell whether it is passed or failed.
const createBookValidator = (data) => {
  return new validator(data, {
    title: "required|string",
    author: "required|string",
    price: "required|integer",
    genre: "required|in:Fiction,Nonfiction,Science Fiction,Fantasy,Mystery",
  });
};

module.exports = createBookValidator;
STEP 5.2: The Update Validator
const validator = require("validatorjs");

const updateBookValidator = (data) => {
  return new validator(data, {
    title: "required|string",
    author: "required|string",
    price: "required|integer",
    genre: "required|in:Fiction,Nonfiction,Science Fiction,Fantasy,Mystery",
  });
};

module.exports = updateBookValidator;
STEP 6: Filling up the Controllers
STEP 6.1: The Create Method
This method will create a new Book in the database. The following steps should be followed
Get the request object from the API.
Validate the request object. If it is incorrect, throw an error.
Create a new database entry with the validated request object.
Return the response for the newly created Book.
const createBook = async (req, res) => {
  const payload = req.body;

  try {
    // everything wrapped inside try - catch to catch the error at
    // each point
    const validator = await createBookValidator(payload);
    if (validator.fails()) {
      // return error code 422 and the errors along with it
      return res.status(422).json({
        error: validator.errors.all(),
      });
    }

    // code will be here only if passed the above validation

    // creating the database entry using the model created, since
    // the request payload is similar to model keys, we can simply
    // pass the whole object inside create method of model.
    const book = await Book.create(payload);

    // return status code 200, and the newly created Book
    return res.status(200).json({ data: book });
  } catch (e) {
    // return status code 500, and the error something went wrong
    return res.status(500).json({ error: `Something went wrong: ${e.message}` });
  }
};
STEP 6.2: The Update Method
This method will update an existing Book in the database. The following steps should be followed
Get the request object from the API and the ID of the Book to be updated.
Check if a Book with that ID exists in the database. If it does not exist, throw an error.
Validate the request body. If it is incorrect, throw an error.
Update the database entry for the Book with the validated request body.
Return the response for the updated Book.
const updateBook = async (req, res) => {
  const payload = req.body;
  const bookId = req.params.id;

  try {
    const validator = await updateBookValidator(payload);
    if (validator.fails()) {
      return res.status(422).json({
        error: validator.errors.all(),
      });
    }

    // Check if the book with the specified ID exists
    const existingBook = await Book.findById(bookId);

    if (existingBook) {
      // Book exists, proceed with the update
      const updateResult = await Book.findByIdAndUpdate(
        bookId,
        { $set: payload },
        { new: true } // To return the updated document
      );

      if (updateResult) {
        res.status(200).json({ data: updateResult });
      } else {
        res.status(400).json({ error: "Could not update the book." });
      }
    } else {
      // Book does not exist
      res.status(404).json({ error: "Book not found." });
    }
  } catch (e) {
    return res
      .status(500)
      .json({ error: `Something went wrong: ${e.message}` });
  }
};
STEP 6.3: The Get Method
This method will retrieve a Book from the database if it exists. The following steps should be followed
Get the ID of the Book to be fetched.
Check if a Book with that ID exists in the database. If it does not exist, throw an error.
Return the response for the requested Book.
const getBook = async (req, res) => {
  const bookId = req.params.id;
  try {
    const book = await Book.findById(bookId);
    if (!book) {
      res.status(404).json({ error: "Book not found." });
    } else {
      res.status(200).json({ data: book });
    }
  } catch (error) {
    console.log(error);
    res.status(400).json({ error: "Could not fetch the book." });
  }
};
STEP 6.4: The Get All Method
This method will retrieve all Books from the database. The following steps should be followed
Retrieve all Books from the database.
Return the response with all the Books.
const getAllBook = async (req, res) => {
  try {
    const books = await Book.find({});
    res.status(200).json({ data: books });
  } catch (error) {
    console.log(error);
    res.status(400).json({ error: "Could not fetch books." });
  }
};
STEP 6.5: The Delete Method
This method will delete a Book from the database if it exists. The following steps should be followed
Get the ID of the Book to be deleted.
Check if a Book with that ID exists in the database. If it does not exist, throw an error.
Delete the Book from the database.
Return the response indicating that the Book has been deleted successfully.
const deleteBook = async (req, res) => {
  const bookId = req.params.id;

  try {
    const result = await Book.deleteOne({ _id: bookId });
    if (result.deletedCount === 1) {
      res.json({ message: "Book deleted successfully." });
    } else {
      res.status(404).json({ error: "Book not found." });
    }
  } catch (error) {
    console.log(error);
    res.status(400).json({ error: "Could not delete the book." });
  }
};
That's all, folks! I hope this tutorial gave you a basic idea of how to create a simple REST API using Node.js, MongoDB, and Mongoose.
Thank you for reading! Please feel free to follow me on social media.


